Widgets, the cornerstone of Flutter
In the previous chapter, we explored the origins of the Flutter framework, who created it, a bit …
read moreFor over eight years, Snapchat kept one of its most powerful technological weapons under wraps. While the mobile development world endlessly debated React Native versus Flutter, engineers at Snap Inc. were building apps with a framework nobody outside the company knew about. A framework that promised something seemingly impossible: 100% native performance without sacrificing development speed. That framework is called Valdi, and it’s now available to all of us.
Valdi’s promise is bold yet straightforward. Write your UI once in TypeScript, and the framework compiles it to fully native views for iOS, Android, and macOS. No webviews hiding HTML and CSS. No JavaScript bridges creating bottlenecks between your code and the operating system. Just real native components running at platform speed, with a declarative model that any modern web developer will recognize instantly.
But Valdi isn’t just another framework promising to be “the next big thing.” It’s a technology that’s already proven its worth in production for nearly a decade, powering critical features in an app used by hundreds of millions of people daily. When Snapchat finally decided to open-source it in beta, they weren’t launching an academic experiment—they were sharing a battle-tested tool.
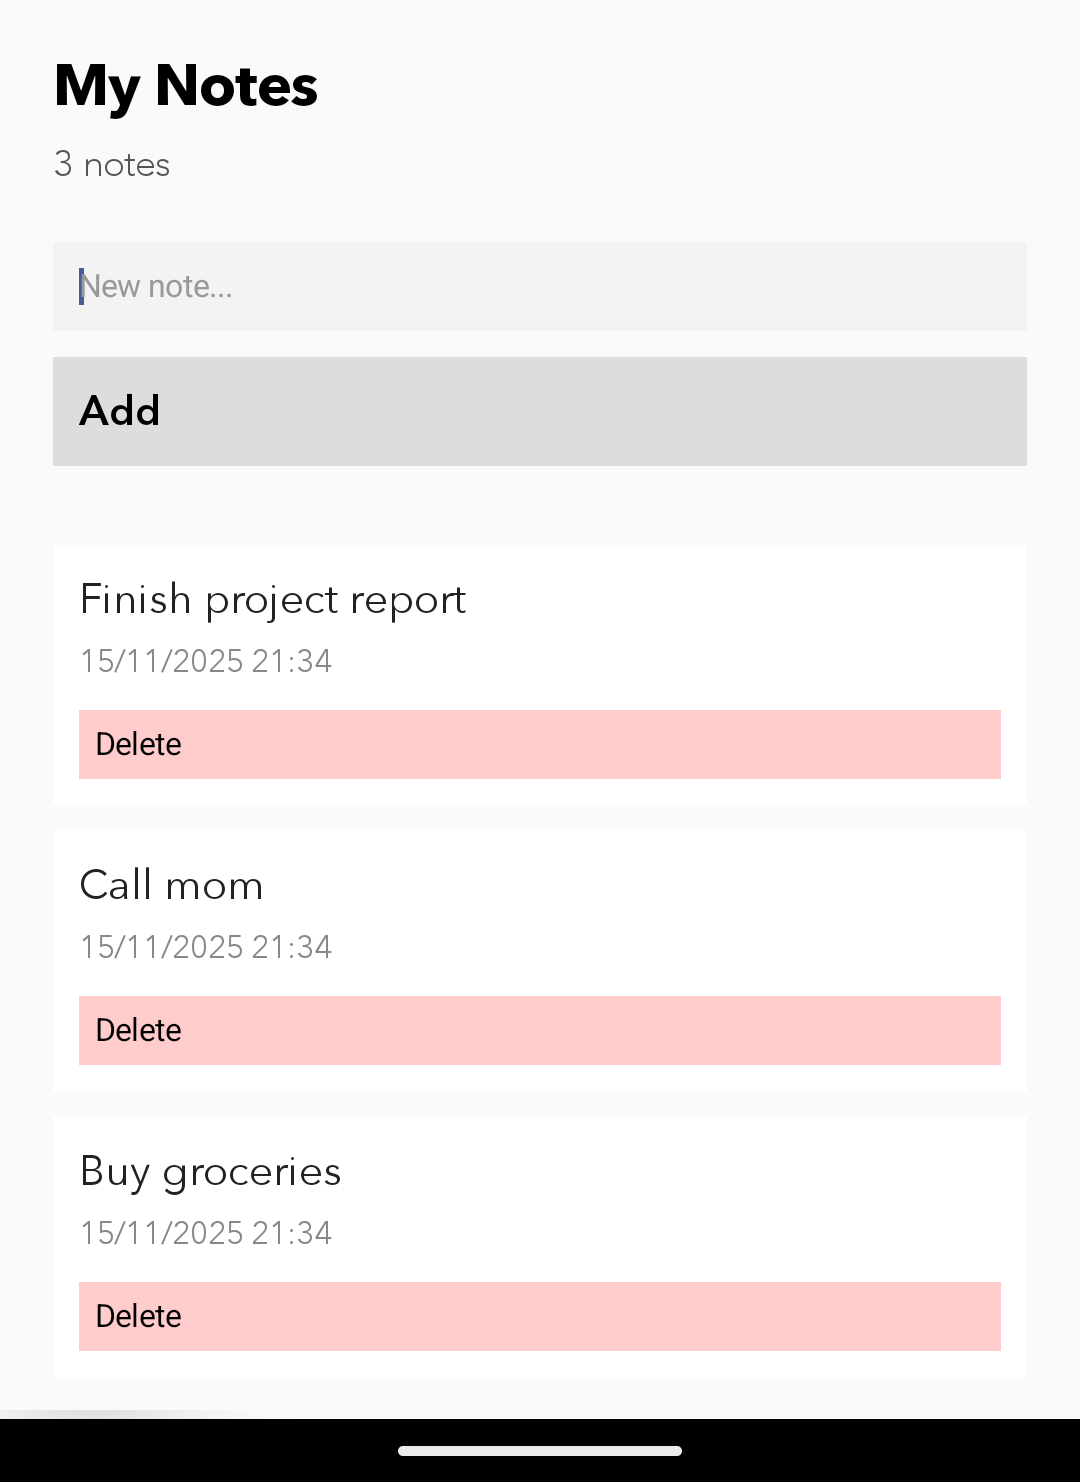
In this tutorial, we’ll explore Valdi from scratch. You’ll learn how to install it, configure it, and build a working app that demonstrates why this framework deserves your attention. We won’t settle for a trivial “Hello World.” We’ll build a notes app that showcases Valdi’s true potential with the smooth performance that only native views can deliver.
Before writing a single line of code, it’s worth understanding what makes Valdi different and why Snapchat decided to build their own framework instead of using existing options. This isn’t unnecessary history—it’s the foundation that’ll help you leverage this tool’s unique strengths.
Cross-platform mobile development has always been a negotiation of trade-offs. React Native lets you use JavaScript and React—technologies millions of developers already know—but introduces a bridge between your code and native APIs that can become a bottleneck when interfaces get complex. Flutter avoids that bridge by compiling to native code, but draws its own UI instead of using system widgets, which means your apps never feel quite “at home” on iOS or Android.
Valdi takes a different path. The framework compiles your TypeScript components directly to native views for each platform. When you define a <label> in your Valdi code, you’re not creating an HTML element rendered in a webview or a custom widget drawn by a graphics engine. You’re creating a real UILabel on iOS or a TextView on Android. The operating system manages them exactly as if you’d created them with Swift or Kotlin.
This architecture has profound implications. Your app responds instantly because there’s no intermediary layer translating intentions. Animations are fluid because they’re executed by the system’s native compositor. Integration with platform-specific features is natural because your code is already speaking the same language as the operating system. All advantages?
The choice of TypeScript as the primary language isn’t accidental. Snapchat needed something their developers could learn quickly, that offered type safety to prevent common errors, and that integrated well with modern development tools. TypeScript checks all these boxes while maintaining the familiar JavaScript syntax most developers already know.
But Valdi doesn’t lock you into TypeScript for everything. For performance-critical code, you can write native modules in C++, Swift, Kotlin, or Objective-C, and the framework automatically generates type-safe bindings that let you call that code from TypeScript like normal functions. This flexibility means you can optimize where it matters without sacrificing productivity in the rest of your app.
Under the hood, Valdi runs a layout engine written in C++ that implements a Flexbox-like system. This engine calculates positions and sizes incredibly efficiently, doing so on the device’s main thread to avoid any costly cross-thread synchronization. When you combine this engine with a global view recycling system, you get lists that can scroll smoothly even with thousands of elements without consuming more memory than necessary.
View recycling is particularly clever. Valdi maintains a global pool of native views that it automatically reuses as users navigate through your app. When a view disappears from the screen, instead of destroying it, the framework saves it for later use. This dramatically reduces the latency of creating new views and makes scrolling perfectly smooth even on mid-range devices.
Now that you understand the “why” of Valdi, it’s time to get hands-on with the “how.” Installation requires some specific steps because we’re working with native code, but the process is simpler than you might expect.
Before starting, make sure you have Node.js installed on your system. Valdi uses npm to manage dependencies, and its CLI requires Node to run. You’ll also need native development environments: Xcode if you plan to develop for iOS or macOS, and Android Studio for Android. These requirements are unavoidable when working with native code, but Valdi leverages them intelligently to give you the best possible development experience.
If you’re on macOS, follow the macOS setup guide. If you’re using Linux, the Linux guide will help you install all necessary system dependencies. These guides are essential because Valdi compiles C++ code and needs platform-specific tooling.
Once system dependencies are ready, cloning the Valdi repository and installing its CLI is straightforward. Open your terminal and run these commands one after another:
  # Clone the official repository
  git clone https://github.com/Snapchat/Valdi.git

  # Navigate to the CLI directory
  cd Valdi/npm_modules/cli/

  # Install the command-line tool
  npm run cli:install

  # Set up the development environment
  valdi dev_setup
The valdi dev_setup command prepares your machine to compile Valdi projects. This includes verifying that all dependencies are present and configuring important paths. The process might take a few minutes the first time, but you only need to do it once per machine.
To confirm everything’s working properly, run valdi --version in your terminal. You should see the installed CLI version. If you get an error saying the command isn’t found, you might need to close and reopen your terminal for the PATH changes to take effect.
With the environment ready, it’s time to create a real project. Valdi includes a bootstrapping command that generates all the necessary structure to start developing immediately. Let’s build a simple notes app that demonstrates the framework’s capabilities in a practical way.
Create a new directory for your project and run the bootstrap command inside it:
  # Create and enter the project directory
  mkdir notes
  cd notes

  # Initialize a new Valdi project
  valdi bootstrap
This command generates several files and folders. The resulting structure might seem complex at first, but each piece has a clear purpose. The src/ directory contains your TypeScript code. The BUILD.bazel file defines project configurations like the app name and resources it uses. The ios/ and android/ directories contain the minimal native projects Valdi needs to compile your app on each platform.
The heart of any Valdi app is its components. These are TypeScript classes that extend the base Component class and define how a part of your interface looks and behaves. Let’s create the main component for our notes app.
Create a file src/NotesApp.tsx with the following content:
  import { StatefulComponent } from 'valdi_core/src/Component';

  interface Note {
    id: number;
    text: string;
    createdAt: Date;
  }

  interface NotesState {
    notes: Note[];
    newText: string;
  }

  export class App extends StatefulComponent<{}, NotesState> {
    state: NotesState = {
      notes: [],
      newText: '',
    };

    private handleTextChange = (e: any) => {
      this.setState({ newText: e.text });
    };

    private addNote = () => {
      const text = this.state.newText.trim();
      if (!text) return;

      const newNote: Note = {
        id: Date.now(),
        text,
        createdAt: new Date(),
      };

      this.setState({
        notes: [newNote, ...this.state.notes],
        newText: '',
      });
    };

    private deleteNote = (id: number) => {
      this.setState({
        notes: this.state.notes.filter((n) => n.id !== id),
      });
    };

    // Simple manual date formatter (Intl APIs are not available in Valdi)
    private formatDate = (date: Date): string => {
      const d = date;
      const day = d.getDate();
      const month = d.getMonth() + 1; // 0–11
      const year = d.getFullYear();
      const hours = d.getHours();
      const minutes = d.getMinutes();

      const two = (n: number) => (n < 10 ? '0' + n : '' + n);

      // dd/mm/yyyy hh:mm
      return `${two(day)}/${two(month)}/${year} ${two(hours)}:${two(minutes)}`;
    };

    onRender() {
      <layout width="100%" height="100%" padding={20}>

        {/* HEADER */}
        <label
          value="My Notes"
          font="AvenirNext-Bold 22 unscaled 22"
          color="#000000"
        />
        <label
          value={`${this.state.notes.length} notes`}
          font="AvenirNext-Regular 14 unscaled 14"
          color="#555555"
          marginTop={5}
        />

        {/* INPUT */}
        <layout marginTop={20}>

          {/* Wrapper because <textfield> does not support padding */}
          <view padding={10} backgroundColor="#F3F3F3">
            <textfield
              value={this.state.newText}
              placeholder="New note..."
              placeholderColor="#999999"
              onChange={this.handleTextChange}
            />
          </view>

          <view
            marginTop={10}
            padding={10}
            backgroundColor="#DDDDDD"
            onTap={this.addNote}
          >
            <label
              value="Add"
              font="AvenirNext-DemiBold 16 unscaled 16"
              color="#000000"
            />
          </view>
        </layout>

        {/* NOTES LIST */}
        <scroll width="100%" marginTop={20}>
          <layout>
            {this.state.notes.map((item) => (
              <view
                key={item.id.toString()}
                padding={10}
                marginTop={10}
                backgroundColor="#FFFFFF"
              >
                <label
                  value={item.text}
                  font="AvenirNext-Regular 16 unscaled 16"
                  color="#222222"
                />

                <label
                  value={this.formatDate(item.createdAt)}
                  font="AvenirNext-Regular 12 unscaled 12"
                  color="#888888"
                  marginTop={5}
                />

                <view
                  marginTop={10}
                  padding={6}
                  backgroundColor="#FFCCCC"
                  onTap={() => this.deleteNote(item.id)}
                >
                  <label value="Delete" color="#000000" />
                </view>
              </view>
            ))}
          </layout>
        </scroll>

        {/* EMPTY STATE */}
        {this.state.notes.length === 0 && (
          <layout marginTop={40} alignItems="center">
            <label
              value="No notes yet"
              font="AvenirNext-Regular 16 unscaled 16"
              color="#777777"
            />
          </layout>
        )}

      </layout>;
    }
  }
This component demonstrates several key Valdi concepts in action. First, notice how we define state using the NotesState interface and extending StatefulComponent. This component holds all the information that can change during the component’s lifecycle: our notes array and the text the user is currently typing. When any of these values change, we call this.setState() to tell Valdi it should update the state and re-render the component with the new data reactively.
The onRender() method defines the app’s visual structure using familiar JSX syntax. Each tag like <view>, <label>, or <textfield> translates to its native equivalent on the target platform. Styles are applied through props rather than separate stylesheets, and Valdi optimizes and applies them directly to native components.
List rendering uses a simple map() over the notes array inside a <scroll> and <layout>. While this example uses a straightforward approach, Valdi also offers optimized list components that leverage UITableView on iOS and RecyclerView on Android. With those components, when you have hundreds or thousands of notes, Valdi only keeps visible views in memory plus a few extras for pre-rendering. As users scroll, views leaving the screen are automatically recycled to display new items.
With your component ready, it’s time to see the app running on a device or simulator. For iOS, run:
  # Install iOS dependencies and compile the project
  valdi install ios

  # This will open Xcode and compile the app
  # You can also specify a specific simulator
  valdi install ios --simulator "iPhone 15 Pro"
The first compilation always takes longer because Valdi must process all dependencies and compile the C++ layout engine code. Subsequent builds will be much faster thanks to the incremental cache system.
For Android, the process is similar:
  # Install Android dependencies and compile the project
  valdi install android

  # This will open Android Studio or deploy to a connected emulator or device
Make sure you have an Android emulator running or a physical device connected before running this command. Valdi will automatically detect the available device and deploy the app to it.
One of Valdi’s most impressive features is its hot reload system. Once your app is running on the simulator or device, open a new terminal and run:
valdi hotreload
Now every time you save a change to your TypeScript code, the app will automatically update on the device in milliseconds. You don’t need to recompile, restart the app, or lose state. You can be editing a label’s text, save the file, and see the change reflected instantly while the app maintains all your notes and navigation state exactly as they were.
This extremely fast development cycle is possible because Valdi reloads only the JavaScript code without touching native code. The layout engine and native views keep running—they simply receive new instructions about what to display.
Now that you’ve built a functional app with Valdi, it’s worth discussing how to take your project to the next level and prepare it for a real production environment.
As your app grows, keeping everything in a single file becomes unmanageable. Adopt a clear folder structure from the start. Separate your components into individual files, group related components in folders, and keep your business logic separate from your UI code.
src/
├── components/
│   ├── NoteItem.tsx
│   ├── NoteList.tsx
│   └── NoteForm.tsx
├── modules/
│   └── NotesStorage.ts
├── services/
│   └── NotesService.ts
└── NotesApp.tsx
This separation makes your code easier to test, maintain, and understand for other developers joining the project.
While Valdi’s view recycling system is highly efficient, there are practices that can make your lists even faster. Avoid heavy calculations inside the renderItem method. If you need to transform data, do it once when it changes and save the result in state. Keep styles as static as possible—creating new style objects on each render forces the layout engine to recalculate positions unnecessarily.
Valdi represents a refreshingly different approach to cross-platform mobile development. Instead of trying to completely abstract platform differences or simulate native components, it embraces each operating system’s unique capabilities and simply gives you a productive way to access them. The result is a development experience that feels modern and familiar but produces apps with the performance and feel of fully native applications.
It’s not the perfect solution for every project. If your team already has deep experience with React Native or Flutter and you’re happy with the results, switching offers no obvious benefits. But if you’re starting a new project, or if you’ve hit the performance limitations of other frameworks, Valdi deserves serious consideration.
Valdi’s greatest strength is perhaps not technical but philosophical. It’s a tool built by developers who use it every day to solve real problems. It’s not a commercial product designed by committee to check boxes on a spec sheet. It’s software born from necessity, refined through years of production use, and shared with the hope that others will find the same value.
Now it’s your turn to explore, experiment, and build. Take the concepts from this tutorial and push them further. Build the app you’ve been imagining. And when you do, share what you learn. The Valdi community is growing, and every voice helps shape the future of software development.
Happy Coding!
That may interest you
In the previous chapter, we explored the origins of the Flutter framework, who created it, a bit …
read moreIntroduction In the previous chapters of our series on Flutter, we’ve laid down a solid …
read moreIn the world of mobile application development, Flutter has stood out as one of the most innovative …
read more