Introduction
In the previous chapters of our series on Flutter, we’ve laid down a solid theoretical and practical foundation that allows us to delve deeper into the fascinating world of cross-platform application development. We began our journey with an Introduction to Flutter, where we discovered what Flutter is and why it has gained so much popularity among developers. Then, in our second chapter, we explored the concept of Widgets, the fundamental building blocks of any Flutter application, learning how they are organized into a tree to build interactive and attractive user interfaces. More recently, in the third chapter, we delved into Dart, the programming language optimized by Google for development with this framework, getting familiar with its syntax, features, and how it leverages this powerful language to create efficient and natively compiled applications.
Now, in this chapter, we are ready to take a significant step: creating our first complete Flutter project. Together, we will not only understand the hierarchical structure that underlies a Flutter project and how to organize our files and code to maximize efficiency and scalability, but we will also put into practice everything learned by developing a basic project: a palindrome checker.
Through this project, we will explore creating user interfaces, handling user input, and applying logic in Dart to determine whether a word or phrase is a palindrome, meaning it reads the same forwards and backwards. It’s an excellent opportunity to see interactive widgets in action, learn more about managing state in Flutter, and understand how an idea is transformed into a functional application that you can run on your own device.
Preparations
Before diving into the development of our application, it’s crucial to have our development environment correctly set up. We will use Android Studio, complemented with the Flutter and Dart plugins, to provide us with a comprehensive development experience. These plugins are available in the Android Studio Marketplace (accessible from its configuration panel) and are essential for working with Flutter.
When it comes to starting a new Flutter project, you have the flexibility to choose the method you prefer. You can opt for the speed and simplicity of the command line, where a simple command sets up everything necessary to get started:
flutter create palindrome_validator
Or we can also use Android Studio itself, which in its latest versions allows us to create our Flutter project using an
intuitive graphical interface from the File > New... > New Flutter Project... option, which will guide you through the
initial setup. Now that we have laid the groundwork for starting our Flutter project, we are ready to first examine the
project structure.
Project Structure
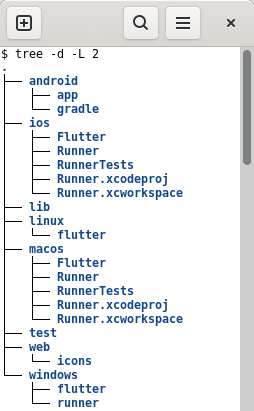
We can observe a basic directory and file structure that resembles the following:
-
android: Contains Android-specific files for your project, build configurations, manifest, and resources.
- app: Main folder for Android-specific application code, including source code and resources.
- gradle: Houses Gradle scripts and configurations needed to compile the application.
-
ios: Stores iOS-specific files, including Xcode project files and Objective-C/Swift source code.
- Flutter: Used by the Flutter plugin for Xcode, contains configurations to compile the Flutter part of your app.
- Runner: Contains iOS-specific source code and application configuration files.
- RunnerTests: Test files for your iOS application.
- Runner.xcodeproj: Xcode project file.
- Runner.xcworkspace: Xcode workspace that includes your project and dependencies.
-
lib: Directory for your Flutter application’s Dart source code.
-
linux: Contains Linux-specific files to compile your application for Linux desktop.
- flutter: Configurations and scripts specific for compiling your Flutter application on Linux.
-
macos: Similar to
linuxandios, but for MacOS desktop applications.- Flutter: Configurations to compile the Flutter part of your MacOS application.
- Runner: Configuration files and MacOS-specific source code.
- RunnerTests: Test files for the MacOS-specific code of your app.
- Runner.xcodeproj and Runner.xcworkspace: Xcode project and workspace files for MacOS.
-
test: Directory for Dart test files of your application. We will add a small set of tests at the end.
-
web: Specific files for the web version of your Flutter application, including the HTML entry file and resources.
- icons: Graphic resources such as icons used in the web version.
-
windows: Windows-specific files to compile your desktop application.
- flutter: Configurations and scripts for compilation on Windows.
- runner: Visual Studio project files for Windows.
-
pubspec.yaml: Configuration file for your project, where dependencies, application name, version, and other metadata are specified.
Now that we are familiar with each component of a Flutter project, we are ready to start building our super palindrome
checker app. As mentioned before, the main folder for our application’s source code is the lib directory. This is
where we will begin our work. We will already have an example application stored in it, which is added when creating the
project, located in the main.dart file. This file contains a Stateless Widget as the main widget, which will allow us
to display the number of button presses that we can run from either the IDE or the console with:
flutter run
Application Source Code
The first step, aside from the research and planning phase, in building our palindrome checker app is to create the user
interface and the code. It will feature a text field for users to enter the word or phrase they want to verify, a button
for users to submit the word or phrase, and a text area to display the verification result. We could start by modifying
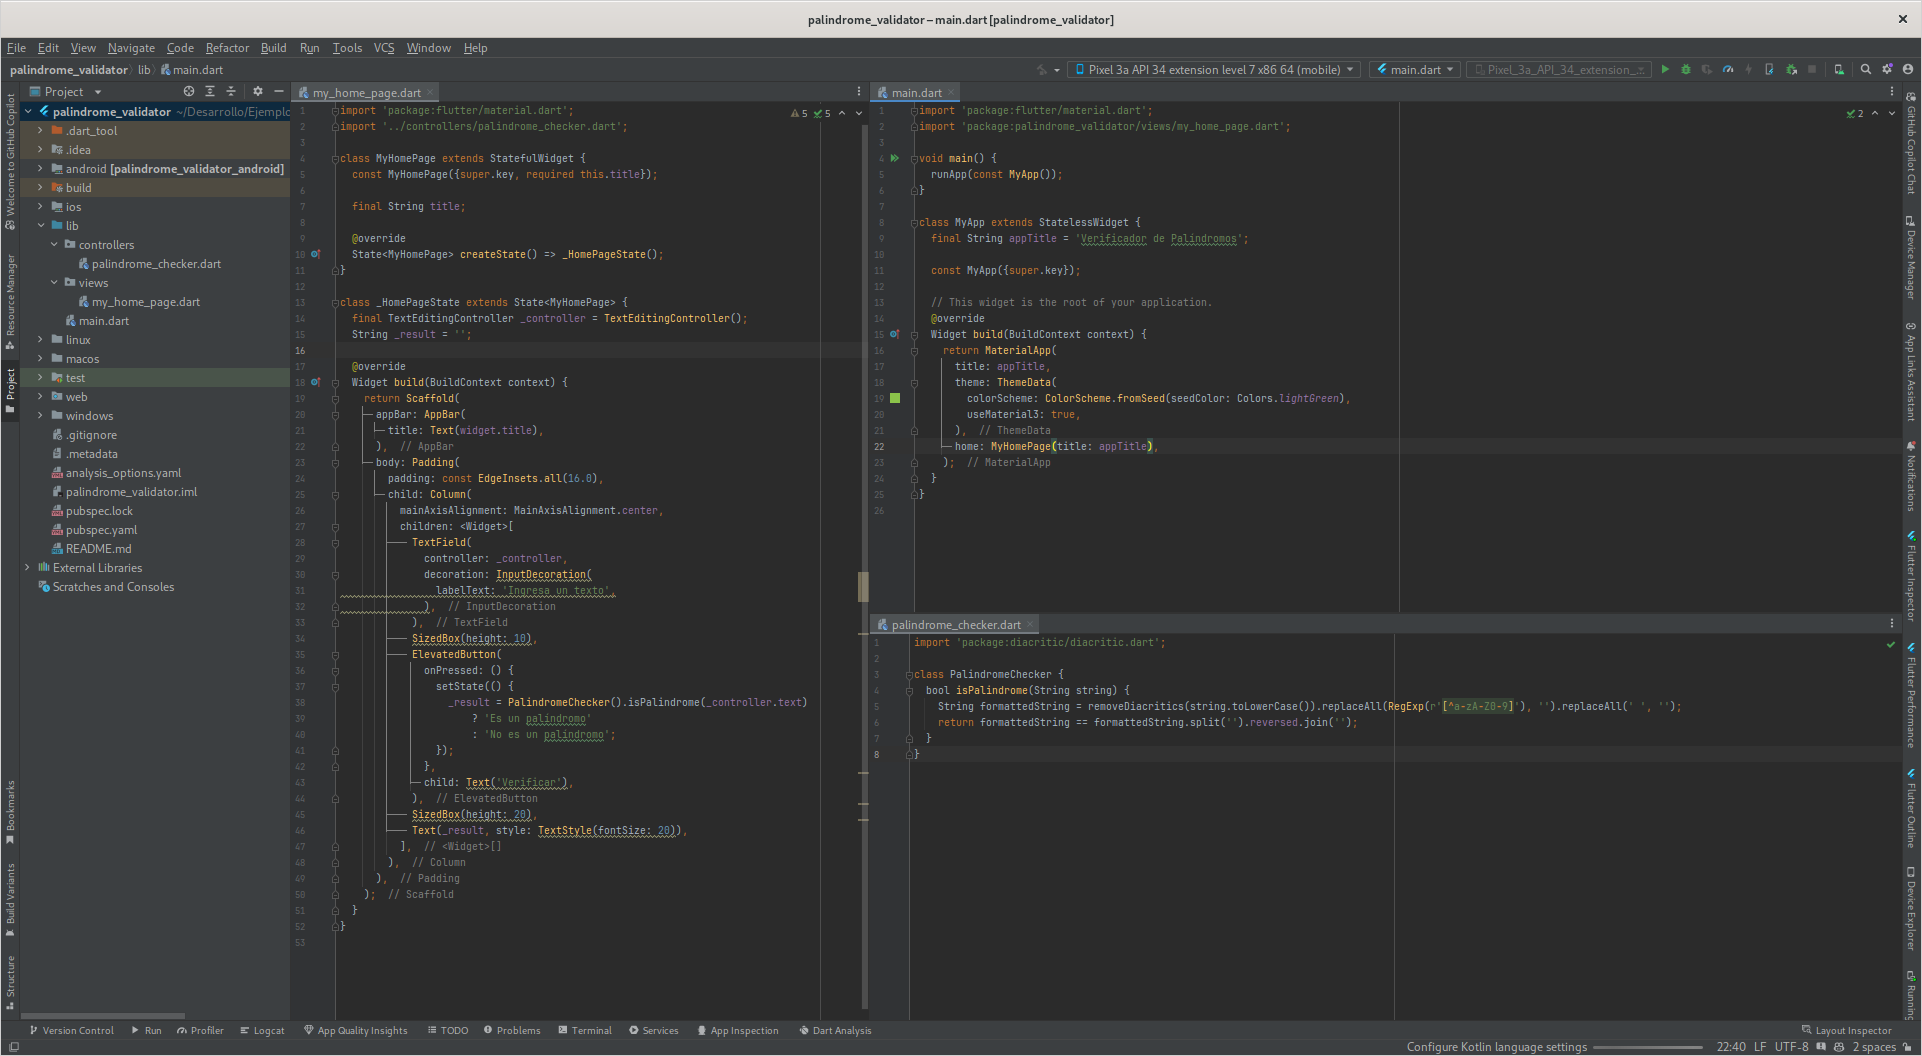
the MyApp class found in the main.dart file, but to make it more modular, we are going to separate the different
parts into multiple files. In the end, our main file will look like this:
  import 'package:flutter/material.dart';
  import 'package:palindrome_validator/views/my_home_page.dart';

  void main() {
    runApp(const MyApp());
  }

  class MyApp extends StatelessWidget {
    final String appTitle = 'Palindrome Validator';

    const MyApp({super.key});

    // Este Widget es la raíz de la aplicación.
    @override
    Widget build(BuildContext context) {
      return MaterialApp(
        title: appTitle,
        theme: ThemeData(
          colorScheme: ColorScheme.fromSeed(seedColor: Colors.lightGreen),
          useMaterial3: true,
        ),
        home: MyHomePage(title: appTitle),
      );
    }
  }
This Widget is the main entry point of our application, usually few changes are made in this part as it is responsible
for initializing the application along with its related libraries and displaying the first Widget that will be seen. It
launches a Flutter application that uses the principles of Material 3, the latest update to
the Material Design language, offering a more modern appearance than its predecessors. The
application starts with the main() function that runs the MyApp widget, which acts as the root of the application.
Within MyApp, a MaterialApp widget is used to set up global visual and navigation aspects of the application,
including the title and theme.
The application’s theme is defined using ThemeData, where the use of Material 3 is specified with the useMaterial3
parameter, and a custom color scheme is set with ColorScheme.fromSeed(seedColor: Colors.lightGreen). This way of
defining the theme leverages a functionality of Material 3 that allows generating a consistent color palette from a seed
color, in this case, Colors.lightGreen. Finally, it points to MyHomePage as the home page, passing the application’s
title to this page for use.
In our case, the MyHomePage Widget is located in the my_home_page.dart file, within the views directory, which
would be responsible for displaying the user interface:
  import 'package:flutter/material.dart';
  import '../controllers/palindrome_checker.dart';

  class MyHomePage extends StatefulWidget {
    const MyHomePage({super.key, required this.title});

    final String title;

    @override
    State<MyHomePage> createState() => _HomePageState();
  }

  class _HomePageState extends State<MyHomePage> {
    final TextEditingController _controller = TextEditingController();
    String _result = '';

    @override
    Widget build(BuildContext context) {
      return Scaffold(
        appBar: AppBar(
          title: Text(widget.title),
        ),
        body: Padding(
          padding: const EdgeInsets.all(16.0),
          child: Column(
            mainAxisAlignment: MainAxisAlignment.center,
            children: <Widget>[
              TextField(
                controller: _controller,
                decoration: InputDecoration(
                  labelText: 'Ingresa un texto',
                ),
              ),
              SizedBox(height: 10),
              ElevatedButton(
                onPressed: () {
                  setState(() {
                    _result = PalindromeChecker().isPalindrome(_controller.text)
                        ? 'A palindrome'
                        : 'Not a palindrome';
                  });
                },
                child: Text('Verificar'),
              ),
              SizedBox(height: 20),
              Text(_result, style: TextStyle(fontSize: 20)),
            ],
          ),
        ),
      );
    }
  }
This fragment implements a main page MyHomePage, which inherits from StatefulWidget, a stateful Widget that will
allow the user interface to react to state changes, such as updating the result after analyzing the phrase. The state is
managed through _HomePageState, where a TextEditingController _controller is initialized to capture the user’s
input and a variable _result to store the verdict on whether the entered text is a palindrome or not.
Inside the build method of _HomePageState, the user interface is structured using a Scaffold, which provides
an AppBar application bar to display the title and a body that organizes the internal widgets with Padding and
a Column. The latter vertically aligns the widgets in the center, including a TextField for the user’s input,
followed by an ElevatedButton that, when pressed, invokes the palindrome verification
through PalindromeChecker().isPalindrome. The result of this verification is assigned to _result and displayed below
the button in a Text widget.
The use of setState within the onPressed of the button ensures that the user interface is updated with the new
result each time the user presses “Verify”. This code effectively demonstrates how interactive user interfaces can be
built in Flutter, processing and displaying user input dynamically.
As we discussed in the first introduction article to Flutter, stateless Widgets are those that do not change over time, while stateful Widgets do, in this case, the application’s state changes each time the user presses the verify button to update the result in the corresponding text.
The PalindromeChecker class we see next is responsible for performing the logic related to the analysis of the entered
text, basically, whether it reads the same forwards and backwards:
  import 'package:diacritic/diacritic.dart';

  class PalindromeChecker {
    bool isPalindrome(String string) {
      String formattedString = removeDiacritics(string.toLowerCase()).replaceAll(RegExp(r'[^a-zA-Z0-9]'), '').replaceAll(' ', '');
      return formattedString == formattedString.split('').reversed.join('');
    }
  }
This source code defines a PalindromeChecker class with an isPalindrome method that determines if a string of text
is a palindrome. It ignores uppercase, lowercase, spaces, punctuation marks, and accents. The method first converts the
string to lowercase and uses the removeDiacritics function from the diacritic package. Then, it removes all
non-alphanumeric characters and spaces. Finally, it compares the formatted string with its reversed version to check if
it’s a palindrome, returning true if it is, or false otherwise.
We use the diacritic package to remove accents from words and phrases, thus only considering the characters themselves
to determine if the entered word is truly a palindrome. To add this package to our project, we can use the command line
or Android Studio itself; in this case, we use the command line:
flutter pub add diacritic
We could modify the pubspec.yaml file directly to add the package, but it’s safer to do so through Flutter’s pub
command as it automatically takes care of syncing the project with the newly added libraries. If we modify it manually,
we would have to synchronize it afterward by hand. Additionally, it will automatically determine the current version and
add it to the list of dependencies.
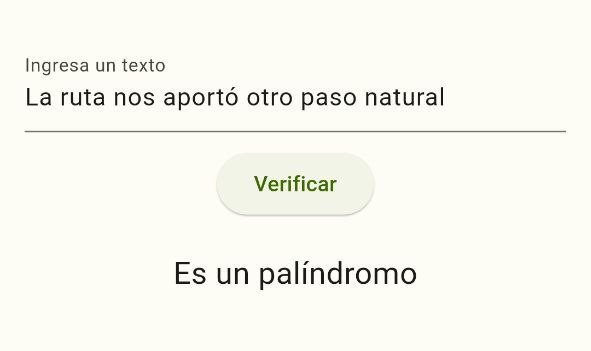
Once the parts of our project are integrated, we can run it and see how it works. The usage is simple: enter a word or phrase in the text field and, after pressing the verify button, it will show whether it’s a palindrome or not. Even though it’s a very simple application, it has served to demonstrate how a Flutter project is structured, how files are organized, and how different parts of the application can be separated to make it more modular and easier to maintain.
Unit Tests
Now that we have created our application, let’s take a step further and add a suite of tests to ensure that the logic of
our application is correct. For this, we could add a file named palindrome_checker_test.dart (the file name should be
the same as its counterpart in the project followed by the suffix _test and stored in a folder in the same place in
the hierarchy) in the test directory (if we have created a controllers folder, we also need to create it in the
tests section) with the following content:
  import 'package:flutter_test/flutter_test.dart';
  import 'package:palindrome_validator/controllers/palindrome_checker.dart';

  void main() {
    final palindromeChecker = PalindromeChecker();

    group('PalindromeChecker', () {
      test('should return true for a palindrome', () {
        expect(palindromeChecker.isPalindrome('A man, a plan, a canal: Panama'), true);
      });

      test('should return false for a non-palindrome', () {
        expect(palindromeChecker.isPalindrome('Not a palindrome'), false);
      });

      test('should return true for a palindrome with mixed case', () {
        expect(palindromeChecker.isPalindrome('Able , was I saw eLba'), true);
      });

      test('should return true for a palindrome with symbols', () {
        expect(palindromeChecker.isPalindrome('Madam, in Eden, I’m Adam.'), true);
      });

      test('should return true for single word palindromes', () {
        var words = ['Ana', 'Anilina', 'Arenera', 'Menem', 'Oso', 'Radar', 'Reconocer', 'Salas', 'Somos'];
        for (var word in words) {
          expect(palindromeChecker.isPalindrome(word), true);
        }
      });

      test('should return true for phrase palindromes', () {
        var phrases = [
          'Anita lava la tina',
          'A mamá Roma le aviva el amor a papá y a papá Roma le aviva el amor a mamá',
          'Amo la pacífica paloma',
          'La ruta nos aportó otro paso natural',
          'No subas, abusón'
        ];
        for (var phrase in phrases) {
          expect(palindromeChecker.isPalindrome(phrase), true);
        }
      });
    });
  }
A small suite of basic tests with words and phrases in both Spanish and English in which, in two different ways, we
check whether the word or phrase is a palindrome or not, doing so in two distinct ways serves an illustrative purpose.
We can run our suite of tests by right-clicking on the test folder and selecting the option Run tests in test. If
everything has finished correctly, we should see a message at the end of the test execution indicating that all tests
have been successfully executed. If not, it will indicate which ones have failed and why. We will not delve deeper into
the topic of testing as it is a subject that deserves its own chapter, but it’s important to keep in mind that it is a
fundamental part of software development.
Conclusion
In this chapter, we’ve taken a significant step in our series on Flutter, creating our first application, which, while not the most useful in the world, has allowed us to explore the structure of a Flutter project, learned how to organize our files and code to maximize efficiency and scalability. We’ve experimented with creating user interfaces, handled user input, and applied logic in Dart to determine whether a word or phrase is a palindrome. We’ve seen interactive Widgets in action, learned more about managing state in Flutter, and understood how an idea is transformed into a functional application that you can run on your device.
In the next chapter, we’ll continue our adventure through the worlds of Flutter, delving deeper into cross-platform application development and exploring how we can leverage the features it provides to create more complex and appealing applications. Until then, I encourage you to play with the application we’ve just created, experiment with its code, and share your ideas and questions in the comments section. And remember, Happy Coding!