Github Copilot as a development buddy
In today’s article, we will discuss Github Copilot, an AI-driven programming assistant …
read moreFor this article, we’re stepping away from programming once again, but staying within a closely related space—whether you focus on the product side or simply want to enhance your personal photos: image editing.
When working on digital products, you often need images for illustrations, promotions, or simply to enhance the user experience. While using common image editing tools might seem simple, not everyone is familiar with them. Basic tasks like removing or changing a background, resizing an image, improving its quality, or adding elements can be a real challenge if you lack experience. However, that has changed with new AI-powered tools, which make these tasks * easier and faster than ever*.
With recent technological advancements and the rise of what many call “Artificial Intelligence,” new tools have emerged that simplify image editing far beyond traditional methods. In this article, we’ll explore some of these tools and how you can use them to enhance the visual assets of your digital projects.
As mentioned earlier, some of the most common image editing tasks include removing backgrounds, resizing images, enhancing quality, and modifying elements. The technical process isn’t always complex, but the real challenge is knowing how to do it—not to mention the creative aspect, which is a whole different world.
In this article, we’ll explore a variety of AI-powered tools, both free and paid, that make these tasks much simpler. The results will vary depending on how “smart” the AI is, so you won’t always get perfect outcomes. However, in general, these tools can save you a lot of time and effort. Let’s dive in!
Let’s start with one of the most common image editing tasks: removing the background. Whether you need to replace it with a new one or simply make it transparent, there are AI tools that make this process effortless.
One such tool is remove-background-web, a free online tool that allows you to upload an image and, within seconds, get it back with the background completely removed—as simple as it sounds.
Here’s an example using our model:
Another common challenge in image editing is increasing the resolution while maintaining quality. Normally, when you enlarge an image, it loses sharpness because the pixels are stretched and interpolated.
Fortunately, AI-based tools like Clarity Upscaler help solve this issue. This tool not only enlarges the image but also “enhances” it. I say that in quotes because, technically, the AI is reconstructing and refining details that it predicts would make the image look more realistic. However, the final quality and accuracy of the results depend on each case and how the parameters are adjusted.
At the time of writing this article, the tool costs $0.012 per use, meaning you get about 83 upscales for just one dollar.
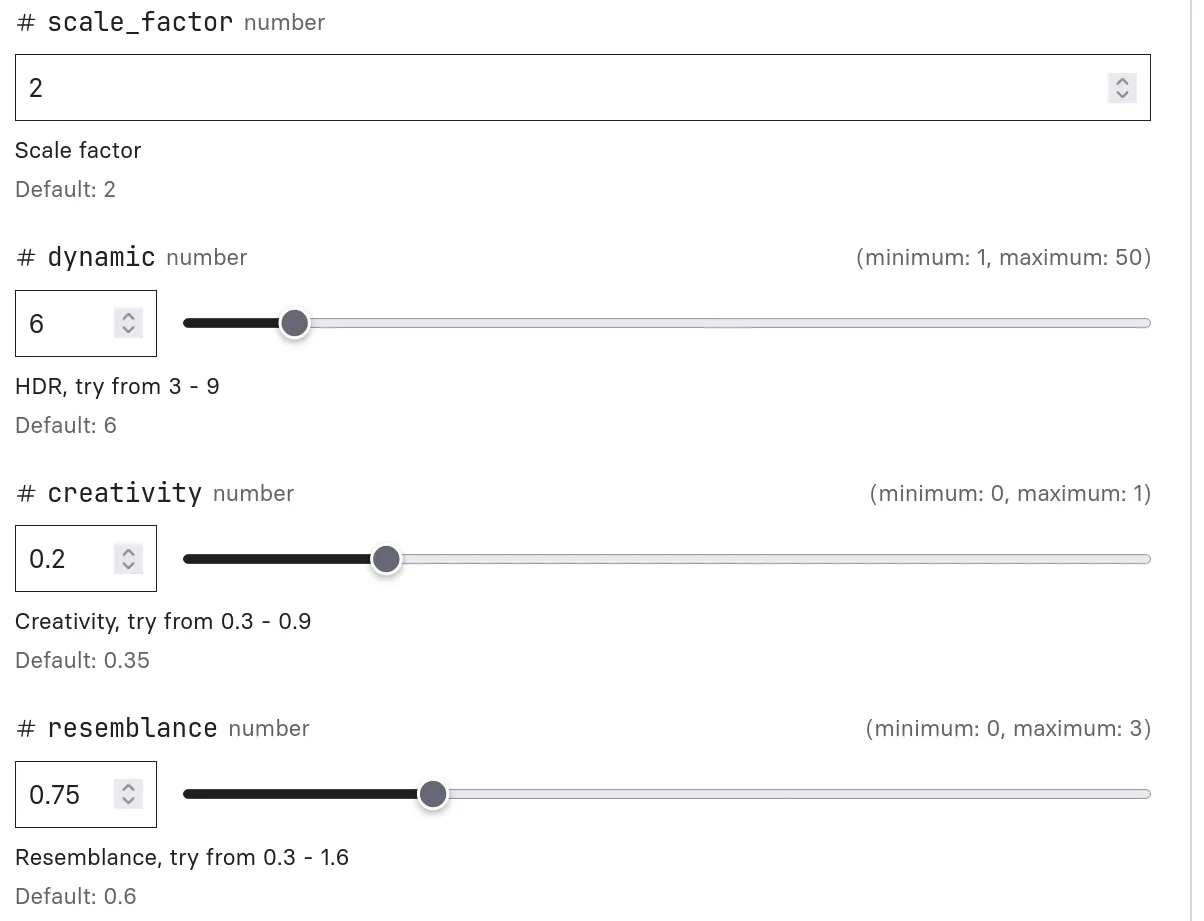
The Clarity Upscaler interface includes three key parameters that you’ll likely use frequently:
By tweaking these three parameters, you can achieve more creative or more realistic results, depending on your needs.
Outpainting is an AI-powered technique that adds content to areas of an image that don’t exist. In other words, it allows you to extend an image by generating new elements based on a description you provide (known as a prompt).
There are several tools available for this task, and one of the most effective is Flux Fill Pro, which enables outpainting and other advanced image modifications.
At the time of writing, the tool costs $0.05 per image, meaning you get about 20 edits for just one dollar. Despite the high computational cost of these AI algorithms, pricing is becoming more affordable over time. As technology advances, it’s likely that these capabilities will be available directly on personal devices without requiring cloud-based services.
The tool is straightforward to use: it requires an image and a text description (preferably in English—you can use a translator or AI assistant like ChatGPT to help with this). Later, we’ll explore additional customization options beyond the basic parameters.
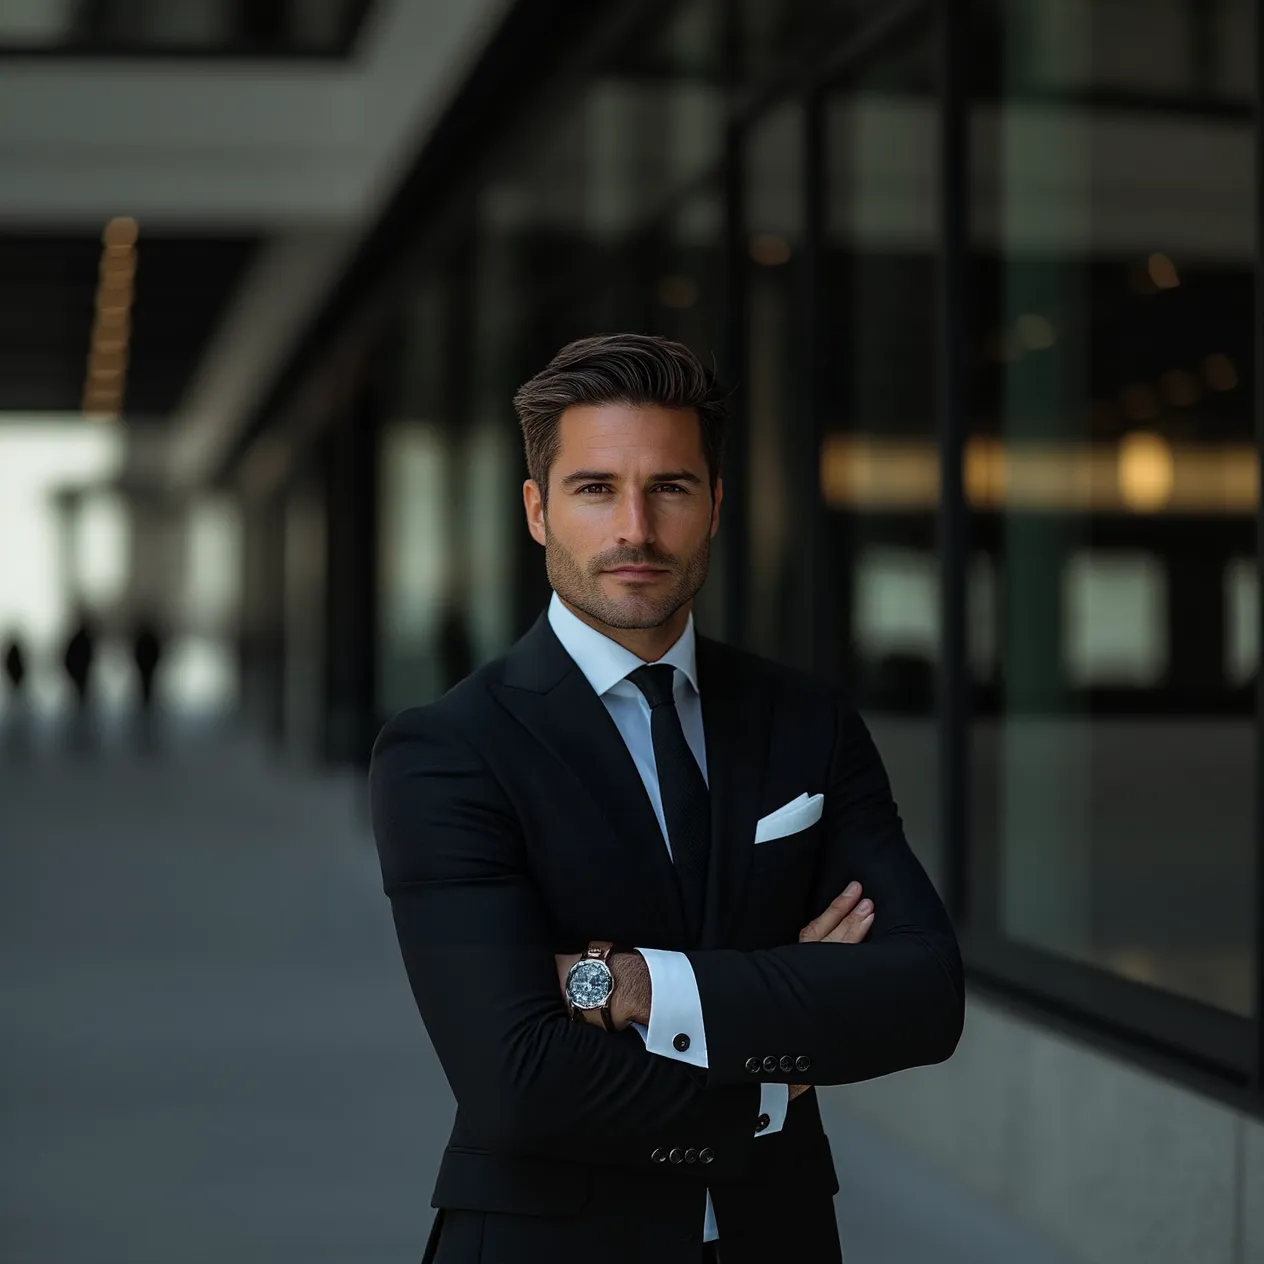
Below is an example of an outpainting with a 2x zoom effect, generated using the following prompt:
A modern urban environment unfolds, featuring a sleek contemporary building with large glass windows reflecting soft natural light. The background is slightly blurred, enhancing depth while maintaining a sense of sophistication. Dark metal frames and subtle architectural details suggest a high-end corporate or commercial district. In the distance, warm ambient lighting from nearby structures adds a touch of elegance, contrasting with the cooler tones of the building’s facade. The overall atmosphere is refined and professional, reinforcing the actor’s confident presence.
A key parameter in this tool is the Outpaint setting, found just below the Mask option. It allows you to specify how the AI should extend the image. The available options (only active if outpainting is set to a value other than None) include:
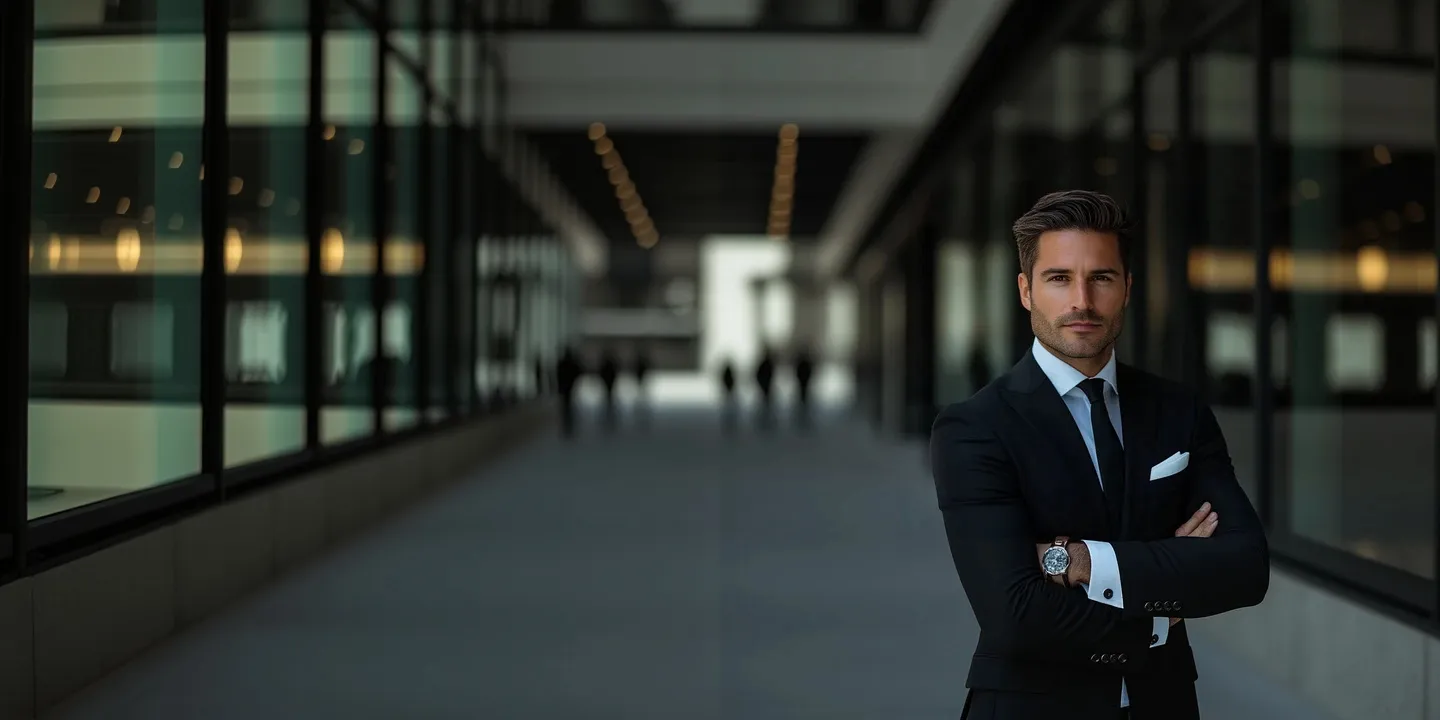
For example, if we wanted to make the previous image wider, we could add new content to the left side. To do this, we would select Left Outpaint and write a text prompt in English describing what should appear in that part of the image.
A spacious, modern corridor extends into the distance, lined with tall glass windows and elegant architectural elements. The polished floor reflects the ambient light, enhancing the sense of depth. In the background, blurred figures walk along the hallway, dressed in business attire, adding a subtle but dynamic human presence. Soft natural light filtering in from the far end of the corridor contrasts with the darker tones of the surrounding structure, creating a balanced and sophisticated atmosphere. The overall setting suggests a high-end corporate environment, reinforcing the actor’s professional and confident demeanor.
As we can see, the image has been modified by adding new content to the left side of the original. Although the transition is noticeable—some elements follow a very similar structure to the original, such as three silhouettes on each side—the overall result is quite convincing and could easily pass as a real image.
Inpainting works similarly to outpainting, but instead of extending an image, it modifies internal elements. This means you can change parts of an image, like replacing a suit with a different one or altering clothing entirely.
To do this, you need a mask—a simple black-and-white image that tells the AI which parts to modify and which to keep. Creating a mask requires basic image editing skills, as you’ll need to define the editable areas manually.
The mask serves as an instruction for the AI:
This allows you to preserve exactly what you want while modifying only specific areas. I created the mask using GIMP, a free and open-source image editor, but any similar software would work just as well.
Now, let’s put inpainting to the test by changing the suit of our model. We’ll use the original image and apply a mask to define the suit area for modification. Then, we provide the AI with a text prompt describing the new suit style:
A charcoal gray three-piece suit, impeccably tailored to enhance his sharp silhouette. The jacket features slim lapels, structured shoulders, and a single-button closure, radiating sophistication. Beneath, a matching vest with a subtle textured weave adds depth to the ensemble, complementing the crisp white dress shirt. A perfectly knotted black silk tie provides a classic contrast, while a neatly folded white pocket square completes the polished look. This suit strikes the perfect balance between tradition and modernity, ideal for corporate leaders or luxury brand ambassadors. Its understated yet refined tone blends seamlessly with the sleek urban setting, reinforcing his commanding presence.
A deep navy-blue double-breasted suit, exuding an aura of power and contemporary confidence. The wide peak lapels and six-button front closure add an assertive executive touch, while the tailored fit enhances his structured physique. The crisp white dress shirt keeps the look clean and professional, while a textured dark blue tie introduces a subtle element of sophistication. A navy pocket square with a fine silver trim peeks elegantly from the breast pocket, catching the light just right. The rich blue hue stands out against the modern backdrop of glass and steel, portraying a dynamic professional at the forefront of industry and innovation.
A light beige linen suit offers a fresh and elegant alternative, perfect for high-profile daytime business events or summer executive meetings. The unstructured blazer, featuring soft shoulders and a slightly relaxed fit, brings a refined yet natural feel, while the matching trousers maintain a sleek, tailored silhouette. A white dress shirt, unbuttoned at the collar, enhances the relaxed yet authoritative look. Instead of a traditional tie, a deep burgundy silk pocket square adds a subtle contrast. The neutral and lightweight fabric of the suit contrasts beautifully with the darker elements of the urban setting, achieving a confident and effortlessly sophisticated appearance.
A deep emerald green suit, perfectly tailored to exude confidence and individuality. The jacket features sharp peak lapels, structured shoulders, and a single-button closure, striking the ideal balance between classic refinement and modern flair. The luxurious green fabric, with a slight sheen under ambient light, enhances the suit’s sophisticated appeal. A crisp white dress shirt provides a clean contrast, while a dark charcoal or black silk tie adds a formal touch. A neatly folded white pocket square in the breast pocket completes the polished look.
If we invert the mask and keep the actor’s head, we can change the background without even having to remove it, just as we did in the first section of this article.
The model stands at the entrance of a modern office building, framed by tall glass doors and sleek metal detailing. The clean architectural lines and polished stone flooring reflect the soft glow of recessed lighting. Behind him, large glass windows reveal a minimalist lobby with neutral tones and contemporary furnishings. The subtle reflections in the glass and the precise, structured design of the space create an atmosphere of professionalism and understated elegance.
The model confidently stands on a luxurious rooftop terrace, overlooking a breathtaking city skyline at sunset. The warm hues of the setting sun cast a golden glow over the distant glass skyscrapers, creating a striking contrast against the deep blue sky. Elegant ambient lighting from modern outdoor lamps subtly illuminates the space, adding depth and sophistication. A sleek glass railing lines the terrace, reflecting the city lights as they begin to flicker on, setting the scene for an exclusive high-profile event.
By combining these AI-powered tools, we can create multiple versions of the same image quickly and effortlessly, without spending excessive time on editing or production. While the results may vary depending on the specific requirements and the level of realism expected, these tools can significantly streamline repetitive and mechanical tasks in image editing. And when you add a touch of creativity, the possibilities become endless!
I hope this article has helped you discover new AI-driven tools that can enhance your workflow and improve the quality of your projects. Until next time—Happy Editing! 🚀
That may interest you
In today’s article, we will discuss Github Copilot, an AI-driven programming assistant …
read moreIn recent years, we are witnessing an unprecedented revolution in multimedia content creation, …
read moreHaving explored the fundamentals of Docker and its power to deploy encapsulated applications, we now …
read more