In today’s article, we will discuss Github Copilot, an AI-driven programming assistant specifically trained for this purpose. Copilot products are a collaboration between OpenAI and Microsoft, with two products currently sharing the same name, Microsoft Copilot, which is integrated into the well-known office suite of the tech giant, Office, and Github Copilot, developed and trained by Microsoft’s subsidiary, Github, specifically designed as a support tool during the software development process.
Github Copilot, the subject of our discussion today, is available as an extension for the most popular code editors. I use the Jetbrains suite daily, but it is also available for Visual Studio Code, albeit in a somewhat more limited capacity. From the testing I’ve conducted, both the autocomplete and the suggestions provided in Code are poorer than in IntelliJ, so I would recommend the latter for the best possible experience.
The tool is powered by ChatGPT version 4 and has been trained with the source code from Github, making its programming potential unique. It is capable of autocompleting code, suggesting lines of code, writing complete functions, and explaining what a piece of code does, among many other things. Furthermore, it can read and understand the context of the code we are working on, making its suggestions more accurate and useful, without the need to provide it each time as we would have to do with ChatGPT if we used it directly.
Introduction to Using Github Copilot
The price of Github Copilot is $9.99 per month, but if you are a student or teacher, you can get it for free. Personally, I would say it is worth it due to having chat integrated with the context of the code and an improved autocomplete compared to that of the IDE itself. It’s important to keep in mind that it is in beta phase, and it is common for it to not work as expected on certain occasions and to behave strangely, repeating the same wrong answer over and over, among other issues.
We will use our IDE’s own store to install the Copilot extension, using Android Studio for our example which is available for free and allows us to test the extension without needing an Jetbrains license. Simply search for it in the extension marketplace and install it. Once completed, it will ask you to log in with your Github account, and that’s it, you can start using it.
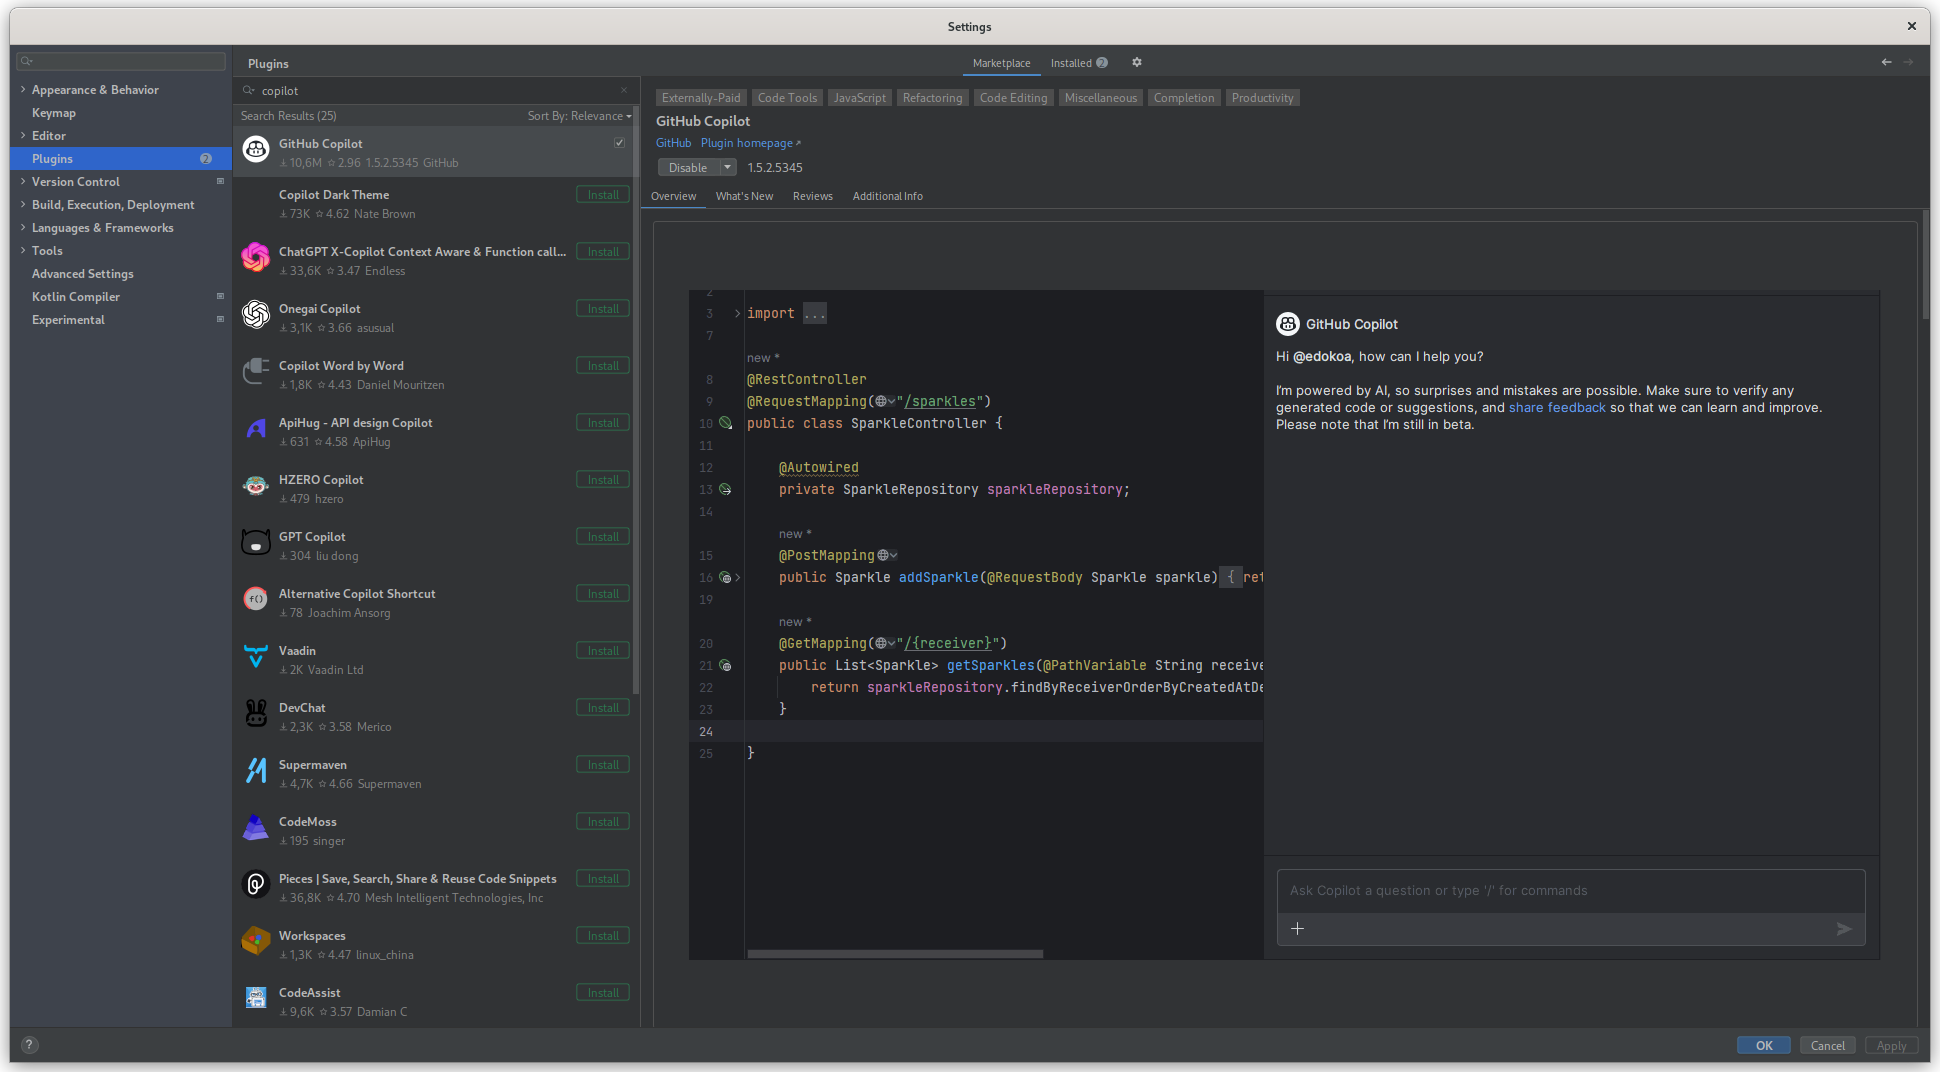
We will now see new tabs in our IDE, one labeled Github Copilot Chat on the right sidebar, and the Github icon on the
bottom bar. The first one allows us direct access to the integrated chat, and the Github icon will enable us to open the
Github Copilot extension to manage our session and settings, as well as to enable or disable certain features.
Integrated Chat
We are now ready to start creating our code, for which we will build a small example program. It will be designed to select a name from a list of names created by the user through a form. We will construct it using Flutter, but this time its version for Linux, Mac OS, and Windows. To do this, I will write the following project description to the Copilot Chat:
We are developing a desktop-based Name Raffle application using Flutter to leverage its cross-platform capabilities for Windows, macOS, and Linux. The application will feature a user-friendly interface where participants can manually enter names via a text input. This setup will facilitate easy data entry and management. The core functionality will be centered around a ‘Start Raffle’ button, which, when activated, will initiate a visually engaging animation that cycles through the names randomly before selecting a winner. This animation will be built using Flutter’s powerful UI capabilities to ensure a dynamic and smooth user experience. The app will be designed to handle a significant volume of entries efficiently, maintaining high performance across all desktop platforms. Our goal is to create an intuitive and attractive application that can be easily accessed and used across different operating systems, enhancing the reach and usability of the tool.

A prompt that is nothing special, I am simply describing in words what I want to do and how, so that Copilot can provide me with a basic project structure. Then I can continue iterating on it to shape the final application. It’s worth mentioning that communicating in English with Copilot (as with ChatGPT) is more effective, although it is not strictly necessary, as it understands and helps perfectly well in Spanish.
Copilot will guide us through the process of project creation and initial setup, as simple as running
the flutter create name_raffle command in the terminal, following the steps indicated by Copilot’s response. After its
creation, we access it from the IDE itself and within the lib folder, we will find the main.dart file, which is the
entry point of our application.
We can replace the contents of the main.dart file with the following code suggested by Copilot:
    import 'package:flutter/material.dart';

    void main() {
      runApp(NameRaffleApp());
    }

    class NameRaffleApp extends StatelessWidget {
      @override
      Widget build(BuildContext context) {
        return MaterialApp(
          title: 'Name Raffle',
          theme: ThemeData(
            primarySwatch: Colors.blue,
          ),
          home: NameRaffleHomePage(title: 'Name Raffle Home Page'),
        );
      }
    }

    class NameRaffleHomePage extends StatefulWidget {
      NameRaffleHomePage({Key? key, required this.title}) : super(key: key);

      final String title;

      @override
      _NameRaffleHomePageState createState() => _NameRaffleHomePageState();
    }

    class _NameRaffleHomePageState extends State<NameRaffleHomePage> {
      // TODO: Implement state and methods for loading names and starting the raffle

      @override
      Widget build(BuildContext context) {
        return Scaffold(
          appBar: AppBar(
            title: Text(widget.title),
          ),
          body: Center(
            child: Column(
              mainAxisAlignment: MainAxisAlignment.center,
              children: <Widget>[
                TextField(
                  // Implement text field for name input


                ),
                ElevatedButton(
                  child: Text('Start Raffle'),
                  onPressed: () {
                    // TODO: Implement starting the raffle
                  },
                ),
              ],
            ),
          ),
        );
      }
    }
Now, to run and see it, we ask Copilot again how we can execute the project we just created on our operating system. It
tells us that by using the command flutter config --enable-linux-desktop, we can enable compilation for Linux, being
located in the root folder of our project. Responses are not always the same; you might be guided differently. In
the official documentation, you can check the hardware
requirements and system libraries needed to develop Flutter applications for Linux if needed.
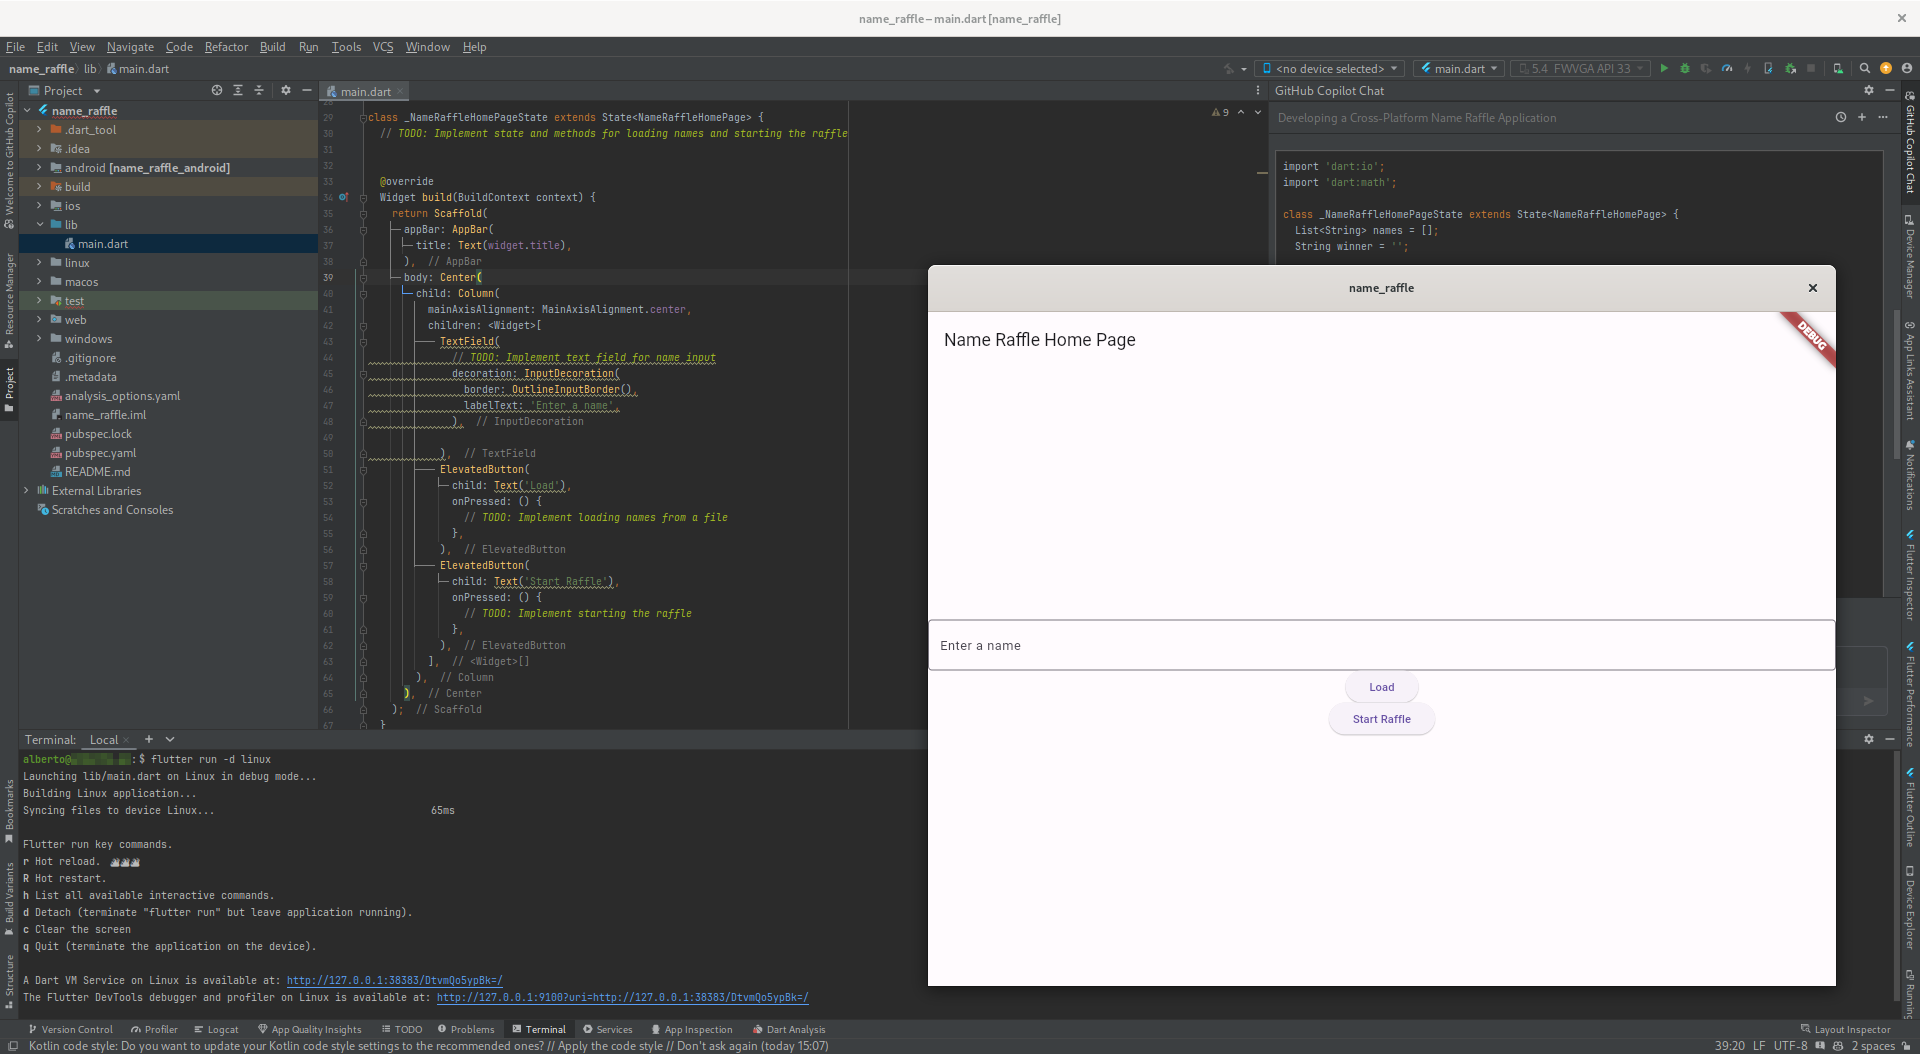
Once Linux compilation is enabled, we can execute the command flutter run -d linux in the terminal, and we will see
how the application opens in a new window. If all has gone well, we should see something like this:
As mentioned earlier, responses are not always the same, so the process may vary, but what interests us here is to analyze the development process using the tool more than the outcome itself. To start, we used the integrated chat in the IDE, which works similarly to ChatGPT but has the context of the code we are working with. In contrast, if we were using ChatGPT, we would have to provide it, what we are doing, what we want to do, where we are at, relevant source code, etc. Now we are going to tell it to reorganize and add some components that we are missing.
We are going to rearrange the elements of this raffle home page and add the ones we are missing. We should keep an empty space to show the selected name when the raffle has been completed, we are missing a button to add the name added by the user to the right of the tesxt field. We need to add the feature to store the names in a list too.
The suggestion provided by Copilot is as follows:
    class NameRaffleHomePage extends StatefulWidget {
      NameRaffleHomePage({Key? key, required this.title}) : super(key: key);

      final String title;

      @override
      _NameRaffleHomePageState createState() => _NameRaffleHomePageState();
    }

    class _NameRaffleHomePageState extends State<NameRaffleHomePage> {
      List<String> names = [];
      String winner = '';
      final nameController = TextEditingController();

      void addName() {
        setState(() {
          names.add(nameController.text);
          nameController.clear();
        });
      }

      void startRaffle() {
        if (names.isEmpty) {
          return;
        }

        final random = Random();
        final index = random.nextInt(names.length);

        setState(() {
          winner = names[index];
        });
      }

      @override
      Widget build(BuildContext context) {
        return Scaffold(
          appBar: AppBar(
            title: Text(widget.title),
          ),
          body: Center(
            child: Column(
              mainAxisAlignment: MainAxisAlignment.center,
              children: <Widget>[
                Text(
                  winner,
                  style: Theme.of(context).textTheme.headlineMedium,
                ),
                Row(
                  children: <Widget>[
                    Expanded(
                      child: TextField(
                        controller: nameController,
                        decoration: InputDecoration(
                          border: OutlineInputBorder(),
                          labelText: 'Enter a name',
                        ),
                      ),
                    ),
                    ElevatedButton(
                      child: Text('Add'),
                      onPressed: addName,
                    ),
                  ],
                ),
                ElevatedButton(
                  child: Text('Start Raffle'),
                  onPressed: startRaffle,
                ),
              ],
            ),
          ),
        );
      }
    }
What it has done is create the list that will store the names entered by the user, a button to add the entered name to the list, and not much more. We only need to ask it to add a field to display the names stored in the list.
Now we need to add a new field to show the list of names added in real time. We should be careful with very big lists so we should use an scrollable component.
To which Copilot suggests adding an expanded widget with the list of names below the button to display the raffle.
  Expanded(
    child: ListView.builder(
      itemCount: names.length,
      itemBuilder: (context, index) {
        return ListTile(
          title: Text(names[index]),
        );
      },
    ),
  ),
In this way, we can see the words we are adding before performing the final name raffle. What has been done so far is basic, without any design or validations, which is sufficient for this example. It should be mentioned that in terms of design, both Copilot and ChatGPT itself are very limited and usually do not offer good solutions unless you specify exactly what you want and describe in depth how.
Beyond the integrated chat in the IDE, Copilot integrates other functionalities such as the ability to ask it for specific tasks and autocomplete with certain improvements over the IDE’s own, although sometimes the solutions provided may not be the most appropriate. Let’s see an example of each of them.
Specific Task
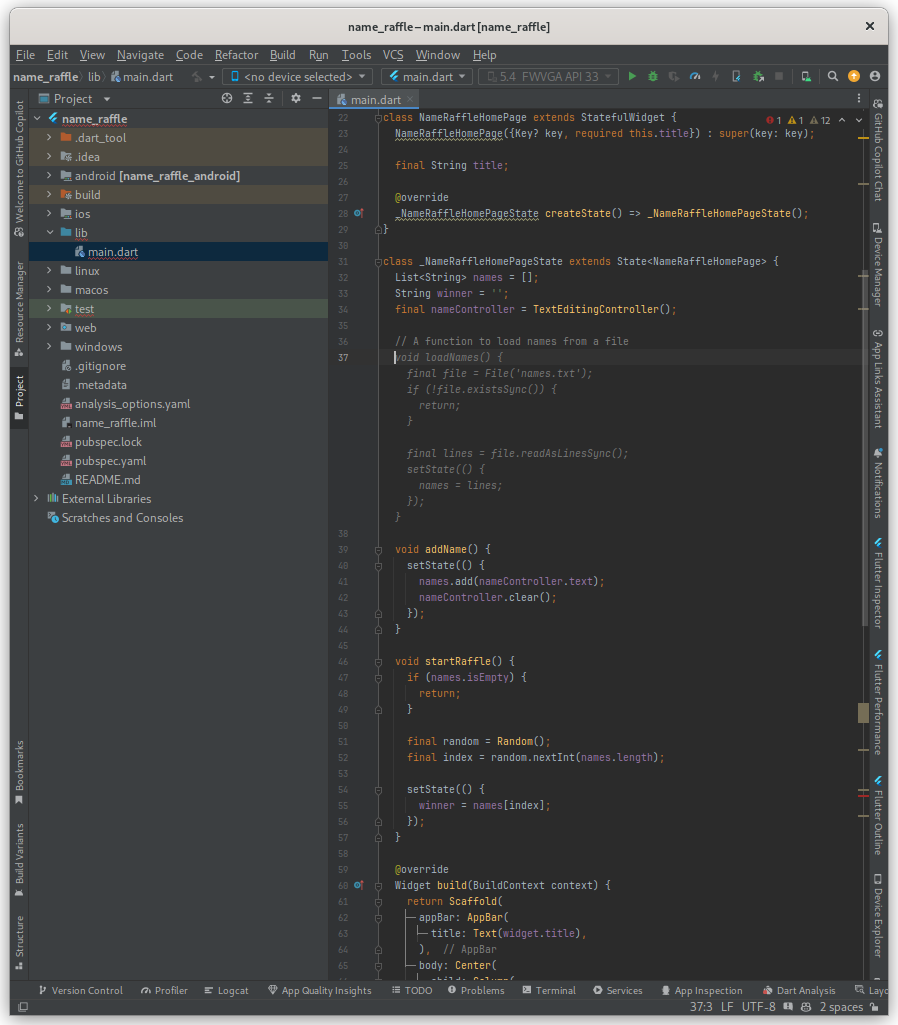
Now let’s see how we can ask Copilot for help with a specific task, in this case, we will request help to implement the functionality responsible for managing the list of names entered by the user. It is enough to create a comment explaining the task we want help completing so that Copilot can do its job. For example, we can ask it to create a method to read names from a text file.
A function to get names from a text file
In this way, Copilot will know exactly what we want to do in that position and will suggest an approach that we can
validate and apply to our code using the Tab key, or discard it if it does not convince us and look for another way to
ask for it. This was the suggested code:
  // A function to load names from a file
  void loadNames() {
    final file = File('names.txt');
    if (!file.existsSync()) {
      return;
    }

    final lines = file.readAsLinesSync();
    setState(() {
      names = lines;
    });
  }
Let’s remember that it does not always create the correct code or the one that best fits our situation, so it will be necessary to review and adapt it to our needs, either by iterating with Copilot or doing it manually. Another of the functionalities, probably one of the most well-known, is code autocomplete, but in this case with certain improvements.
Enhanced Code Autocomplete
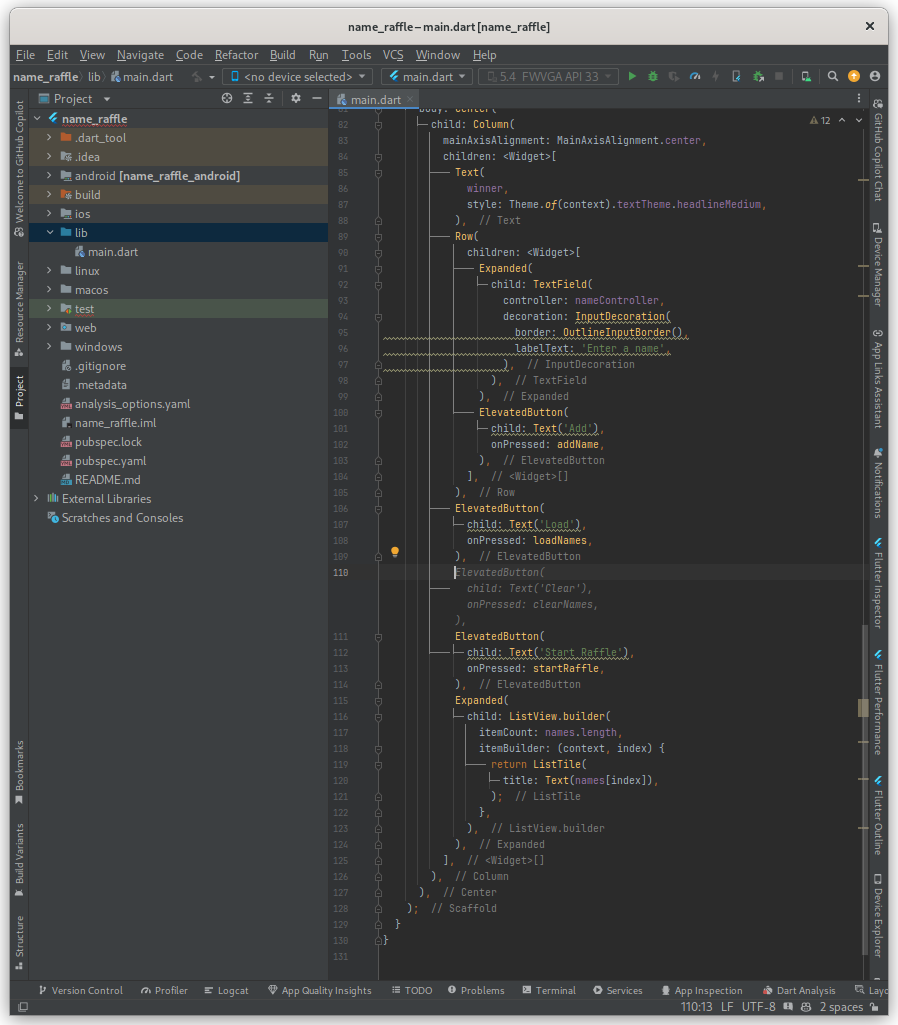
This functionality is usually integrated by default in the majority of the most used IDEs, but thanks to the " intelligence" of Copilot, we will receive advanced suggestions. Let’s create a method to clear the list of names but this time we will start to write the method name and let Copilot complete it.

    void clearNames() {
    setState(() {
      names.clear();
    });
  }
We can also take the opportunity to create the corresponding button responsible for clearing the list of names, simply by starting to write part of the word “ElevatedButton”. Copilot will detect that we have created a new method to clear the names and automatically suggest a button for it. There are cases where it is not even necessary to write anything; just place the cursor in the desired position, next to the buttons in our case, so that Copilot already knows that we are going to add the button corresponding to the method we just created, as demonstrated in the illustration below.
Yes, there are times when it even seems as if it was reading your mind, the simple fact of having the context of the
application integrated into Copilot itself makes the suggestions much more accurate and useful, often even suggesting
what we were planning to do and in the same way, with the only difference being that this way, you just need to press
the Tab key instead of having to write the complete code.
Refocusing the approach
It’s not only for creating code but often it can also help us restructure our ideas or take different approaches if we are stuck or not convinced by the current approach; for example, we can ask, rather bluntly, for it to help us refocus the approach of the application we are developing.
I would like to refocus the approach of this example to do it in a different way
After doing the request in the Chat, it suggests creating a Raffle class responsible for managing both the names and
the state of the raffle and the winner.
    import 'package:flutter/material.dart';
    import 'dart:io';
    import 'dart:math';

    class Raffle {
      List<String> names = [];
      String winner = '';

      void loadNames(String filePath) {
        final file = File(filePath);
        if (!file.existsSync()) {
          return;
        }

        final lines = file.readAsLinesSync();
        names = lines;
      }

      void addName(String name) {
        names.add(name);
      }

      void startRaffle() {
        if (names.isEmpty) {
          return;
        }

        final random = Random();
        final index = random.nextInt(names.length);
        winner = names[index];
      }
    }

    void main() {
      runApp(NameRaffleApp());
    }

    class NameRaffleApp extends StatelessWidget {
      @override
      Widget build(BuildContext context) {
        return MaterialApp(
          title: 'Name Raffle',
          theme: ThemeData(
            primarySwatch: Colors.blue,
          ),
          home: NameRaffleHomePage(title: 'Name Raffle Home Page'),
        );
      }
    }

    class NameRaffleHomePage extends StatefulWidget {
      NameRaffleHomePage({Key? key, required this.title}) : super(key: key);

      final String title;

      @override
      _NameRaffleHomePageState createState() => _NameRaffleHomePageState();
    }

    class _NameRaffleHomePageState extends State<NameRaffleHomePage> {
      final raffle = Raffle();
      final nameController = TextEditingController();

      @override
      Widget build(BuildContext context) {
        return Scaffold(
          appBar: AppBar(
            title: Text(widget.title),
          ),
          body: Center(
            child: Column(
              mainAxisAlignment: MainAxisAlignment.center,
              children: <Widget>[
                Text(
                  raffle.winner,
                  style: Theme.of(context).textTheme.headlineMedium,
                ),
                Row(
                  children: <Widget>[
                    Expanded(
                      child: TextField(
                        controller: nameController,
                        decoration: InputDecoration(
                          border: OutlineInputBorder(),
                          labelText: 'Enter a name',
                        ),
                      ),
                    ),
                    ElevatedButton(
                      child: Text('Add'),
                      onPressed: () {
                        setState(() {
                          raffle.addName(nameController.text);
                          nameController.clear();
                        });
                      },
                    ),
                  ],
                ),
                ElevatedButton(
                  child: Text('Load'),
                  onPressed: () {
                    setState(() {
                      raffle.loadNames('names.txt');
                    });
                  },
                ),
                ElevatedButton(
                  child: Text('Start Raffle'),
                  onPressed: () {
                    setState(() {
                      raffle.startRaffle();
                    });
                  },
                ),
                Expanded(
                  child: ListView.builder(
                    itemCount: raffle.names.length,
                    itemBuilder: (context, index) {
                      return ListTile(
                        title: Text(raffle.names[index]),
                      );
                    },
                  ),
                ),
              ],
            ),
          ),
        );
      }
    }
Due to space and size constraints in responses, Copilot often suggests placing classes in the same file, but in a real development environment, it would be ideal to separate them into different files to maintain a cleaner and more organized structure. This highlights part of the importance of the role of the experienced programmer in keeping the project structured.
Beyond the utility and the quality of the changes made at this specific point, what we want to emphasize is Copilot’s ability to help us rethink ideas and seek new approaches, something that can be very useful in certain situations. Normally, you wouldn’t ask for a literal change of approach but rather, together, you could brainstorm ideas and solutions to find the best approach to a problem. Always keeping in mind that Copilot is not a Product Manager but a tool that helps us program, so it will not always get its suggestions right, nor will those suggestions always be the best option.
Ending
This example demonstrates Github Copilot’s ability to assist us in the software development process, in practice it feels like having a partner working hand in hand with you, often making mistakes, just like we do, but often bringing solutions and occasionally surprising you. Not only for writing code but for rethinking ideas and seeking new approaches, the agility these tools provide should not be underestimated by programmers who want to compete on equal footing with the current style of programming. The trend seems to be towards writing less literal code and focusing more on the logic and structure of it, the more “creative” and generally less tedious part. Just as I was writing this article, on April 29th, Github announced Copilot Workspace, a development environment that integrates AI-driven agents to assist developers from the conception of ideas to the implementation of code in natural language, reducing the amount of code written and seeking to improve productivity.
It can also be used for testing and many other things; having it integrated simply provides us with greater agility and efficiency in our daily work. I recommend trying it for yourself, you can use it to complete the part of loading names from a text file in our example and Happy Coding! (While it lasts…)