In the previous article we explored how to install LMStudio, download models, and use them through its chat interface. That was our first approach to local AI: conversations, capability testing, and experimentation. The GUI chat served its purpose perfectly as an entry point, allowing us to understand model capabilities and get familiar with the tool. But that approach, while useful for exploration, confines us to an application window.
What if you could invoke that same artificial intelligence directly on your code, your files, your entire project? Imagine running a command that reads your source code, understands its structure, and generates professional documentation in seconds. Or analyzes multiple files simultaneously to suggest improvements, generate tests, or refactor code. It’s no longer about “talking to the model,” but about integrating it into your personal development infrastructure as another tool in your toolkit.
When LMStudio exposes an OpenAI-compatible server, you go from being an AI user to being an AI integrator. And the best part is you don’t need to create complex scripts from scratch: professional tools already exist that do the heavy lifting for you. In this article we’ll see how to use aider, a tool that connects your local LMStudio with your projects and/or system.
The mental shift: from consumer to integrator
The difference between using AI and integrating AI goes far beyond technical aspects. It represents a paradigm shift in how we conceive these tools. In chat mode, you open LMStudio, select a model, type your question, copy the answer, and paste it where you need it. It’s a manual and fragmented process that, although functional, doesn’t leverage the true potential of having a language model running on your machine.
When you integrate AI into your workflow through tools like aider, the flow transforms completely. The tool can automatically read your project files, understand their structure, maintain context across multiple files, and generate code or documentation that integrates directly into your codebase. No copying and pasting, no constantly switching windows, no losing context.
Core concepts: understanding the local API
Before we start building, it’s worth clarifying some concepts that will make everything more understandable. An API (Application Programming Interface) is simply a standardized way for different programs to communicate with each other. In our specific case, LMStudio exposes a local HTTP server, typically at http://localhost:1234, which receives text in JSON format with your question or instruction, processes the request using the model you have loaded, and returns the response also in JSON.
The concept is exactly the same as when you test a web project at localhost:3000, but here instead of serving a web page, you “serve” an AI model. The big advantage of this approach is that LMStudio implements the same endpoints and formats as the OpenAI API, which means any tool, library, or script designed to work with the ChatGPT API can work with your local LMStudio simply by changing the base URL. This allows you to use existing tools like aider, Python or Node.js libraries, and makes practically the entire OpenAI tool ecosystem work automatically by pointing to the local server.
When working with the LMStudio API, several elements come into play. The model is the language model you downloaded, like Qwen 3 Coder or GPT OSS. The server is LMStudio in “Developer” mode exposing the HTTP endpoint. The client is the tool or application making requests to the server—in our case, that will be aider. The prompt is the instruction you send, and optionally you can include a system prompt with general instructions about how the assistant should behave.
It’s important to have realistic expectations about the system’s limitations. It’s not magic, it’s your hardware working. Large models require more VRAM and RAM, so if your system has 16GB of RAM, 30B models may be slow or not even load. The first response may take a few seconds—it’s not instant like a Google search. Processing large amounts of text takes time; documenting complex projects can take several minutes. If you run multiple tools simultaneously against the same server, they’ll share resources and slow down responses. And finally, there’s always a trade-off between quality and speed: smaller models respond faster but with lower quality results.
LMStudio as an API server
To start using LMStudio as an API, you need to activate server mode. This process is very simple but has some important considerations you should know. First, make sure you have at least one model downloaded. If you followed the previous article, you should already have QWEN 3 Coder or GPT OSS available. If not, download one from the Discover section of LMStudio. For this article we’ll use models oriented toward code and documentation, so QWEN 3 Coder is an excellent choice.
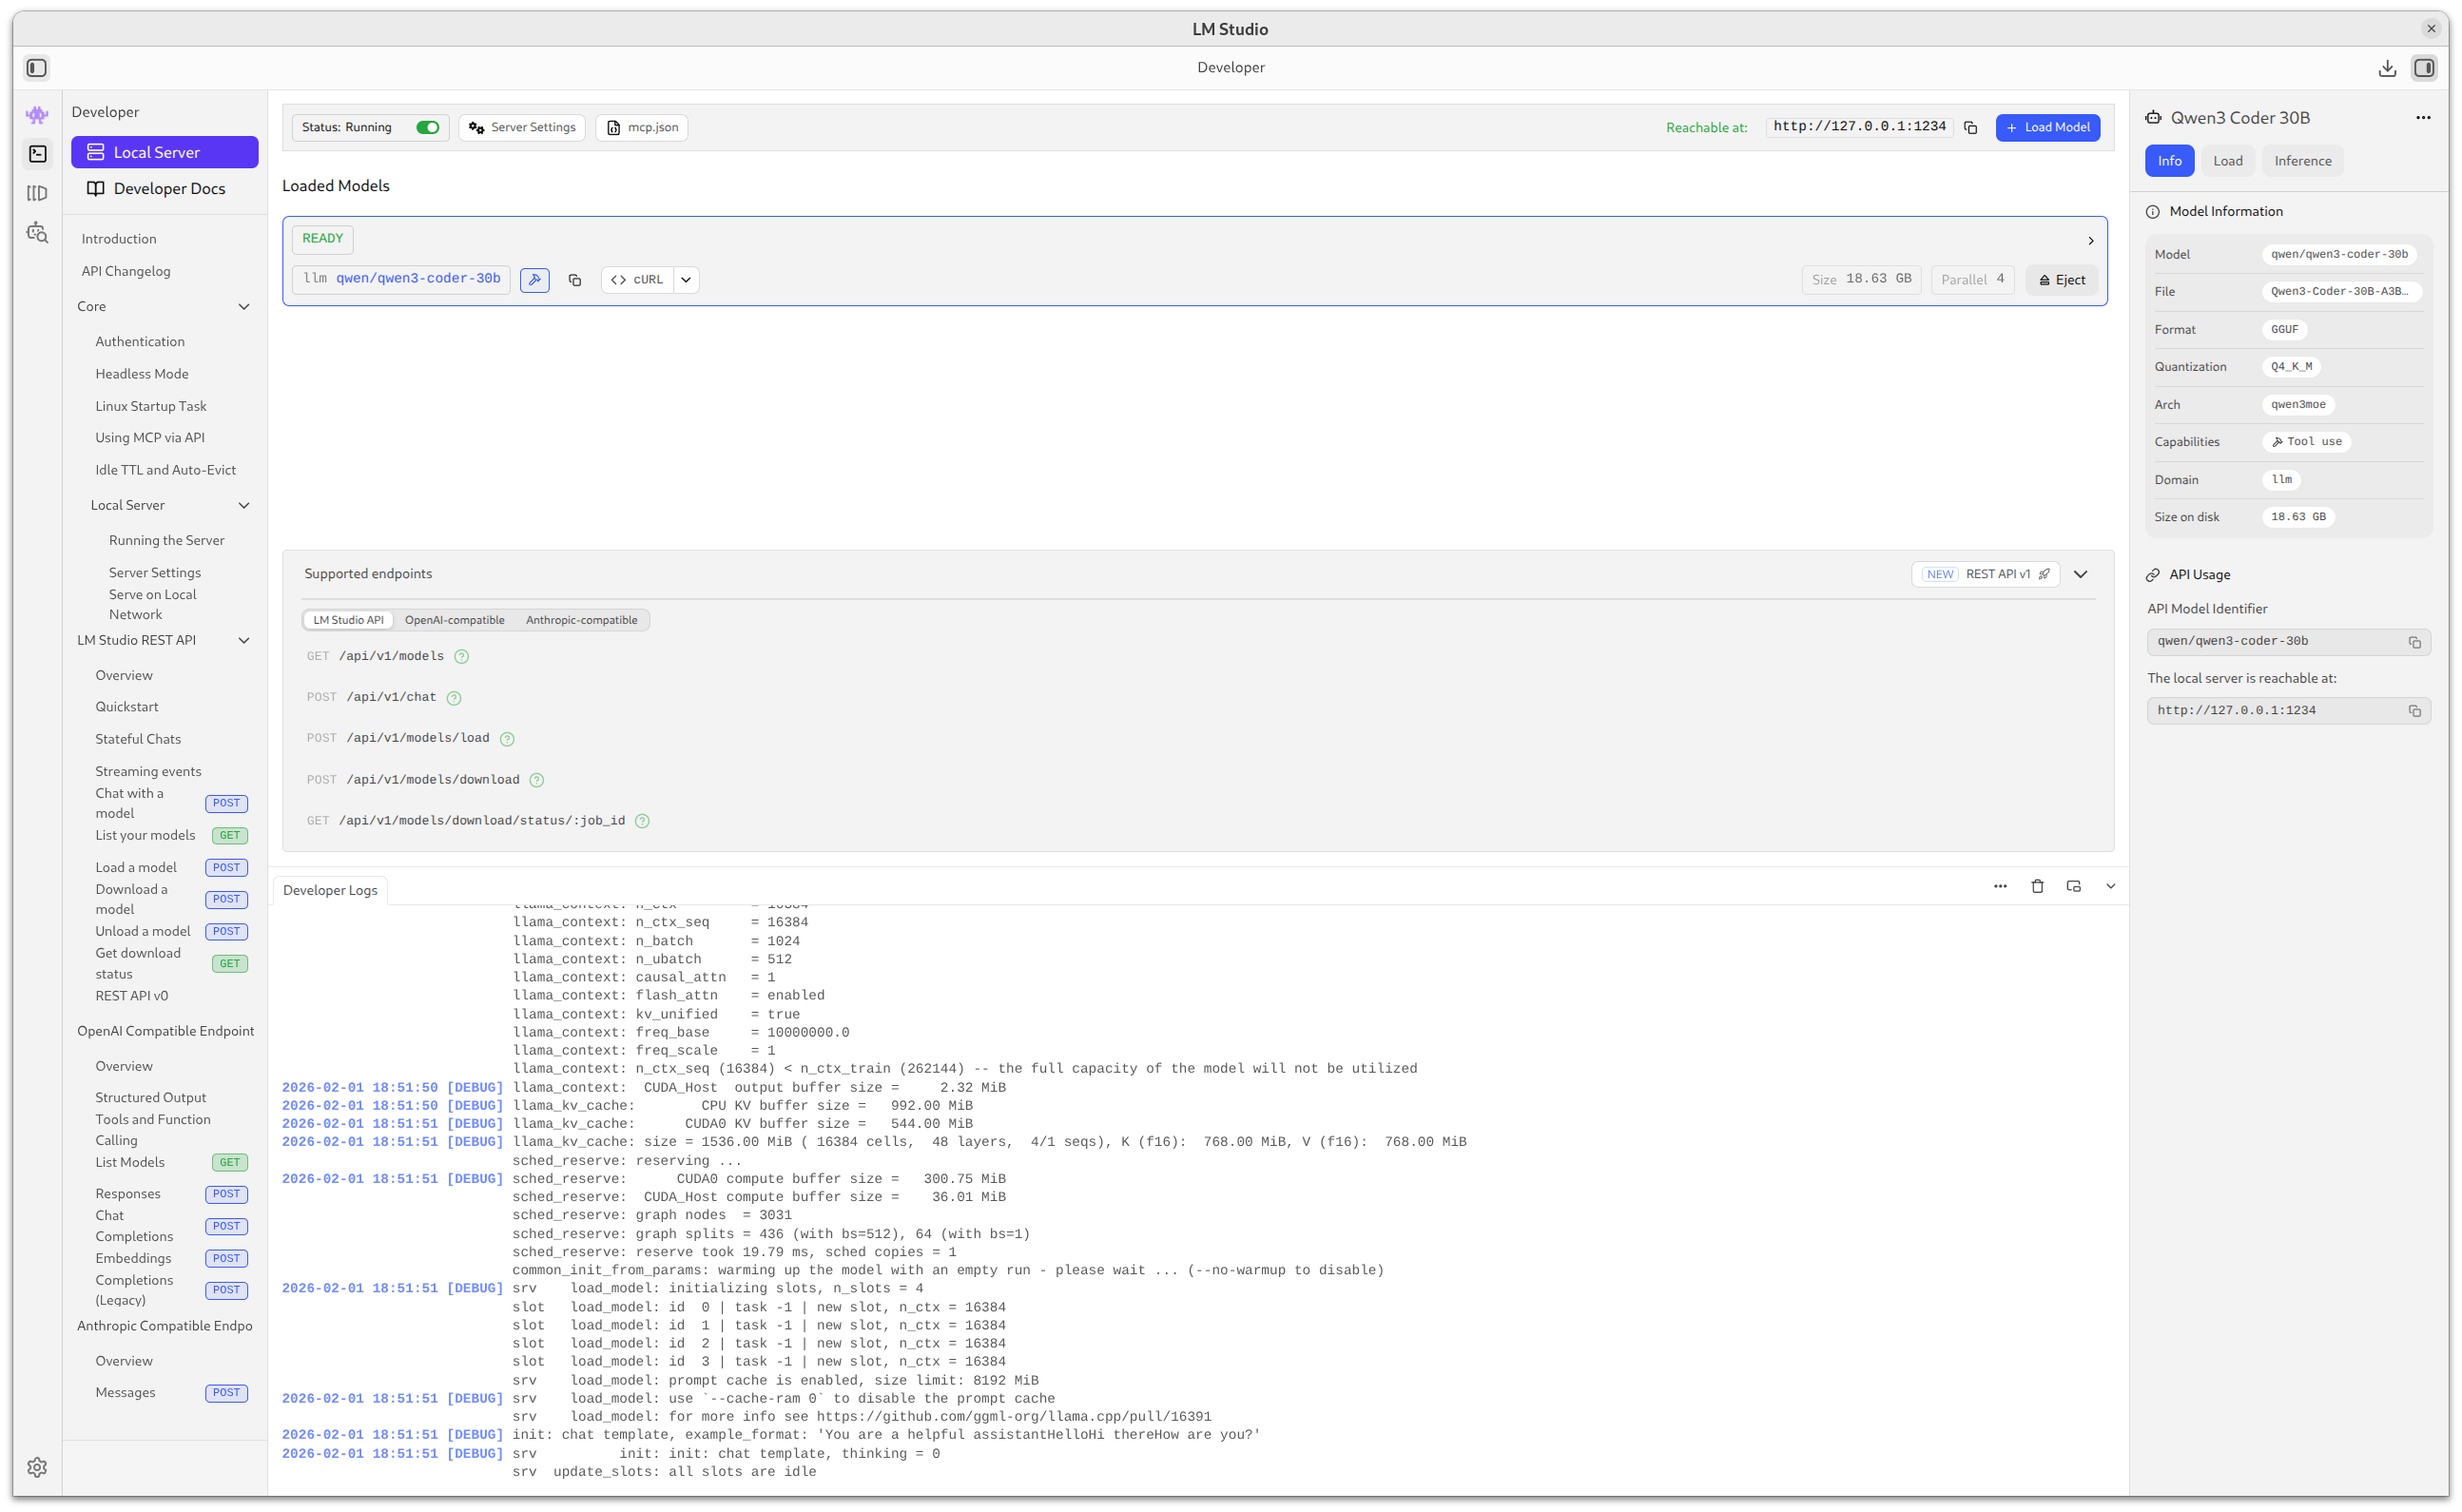
Once you have the model, open LMStudio and go to the Developer section in the left sidebar. Select the model you want to load on the server and click Start Server. You’ll see a message confirming the server is running, typically at http://127.0.0.1:1234. This default configuration is recommended for getting started because it only allows connections from your local machine.
LMStudio lets you configure two important aspects of the server. The host determines where it can be accessed from: 127.0.0.1 means only your local machine can connect, while 0.0.0.0 allows access from any device on your local network. The latter can be useful if you want to use the model from your tablet or mobile, but be careful because any device on your network could make requests and consume your resources. The default port is 1234, but you can change it if that port is already in use on your system.
Security is important even in local environments. If you expose the server on 0.0.0.0, any device connected to your WiFi network can send requests to your model, consuming your resources and slowing down your system. For personal use, always keep 127.0.0.1 unless you specifically need remote access.
To verify everything works correctly, open a terminal and run curl http://localhost:1234/v1/models. You should see a JSON response listing available models. If you get a connection error, verify the server is running in LMStudio and the port matches the one you’re using in the command.
Aider for pair programming with local AI
Now that we have the server running, we need a tool that lets us work with our projects naturally. This is where aider comes in, a command-line tool designed specifically for AI pair programming. Unlike a simple script, aider understands project structure, can read multiple files simultaneously, maintains context between conversations, and can edit files directly.
Installing aider
Aider is available as a Python package and installs easily. Make sure you have Python 3.12 or higher installed on your system. Run in your terminal:
    python -m pip install aider-install
    aider-install
Once installed, verify it works by running aider --version. You should see the installed version of the tool.
Configuration to use LMStudio
By default, aider is configured to use the OpenAI API in the cloud. To make it use your local LMStudio, you need to configure two environment variables. The most convenient way is to add them to your ~/.bashrc or ~/.zshrc:
    export LM_STUDIO_API_KEY=dummy-api-key
    export LM_STUDIO_API_BASE=http://localhost:1234/v1
It’s important to note that although LMStudio doesn’t require a real API key, aider needs the LM_STUDIO_API_KEY variable to have some value (it can be any text like dummy-api-key), otherwise the request will fail when trying to send an empty Bearer token. The LM_STUDIO_API_BASE variable tells aider where to find your local server. After adding these lines, run source ~/.bashrc (or source ~/.zshrc) for the changes to take effect.
Now when you run aider specifying the LMStudio model, it will automatically connect to your local server instead of OpenAI.
Basic usage of aider
Aider works very intuitively. You navigate to your project directory and run aider, optionally indicating which files you want it to analyze. For example, if you want to work with a specific file:
aider src/main.js
This opens an interactive session where you can ask questions about the code, request modifications, generate tests, or any other related task. Aider will read the file, send it as context to the model, and can make changes directly to the file if you ask it to.
If you want aider to analyze your complete project without specifying files, simply run aider in the root directory. The tool is smart enough to understand project structures and focus on relevant files. You can also use special commands within the session like /add file.js to add files to the context or /ls to see which files it’s currently considering.
Specifying which model to use
When working with LMStudio, you must specify which model to use with the lm_studio/ prefix followed by the model name. The format is:
aider --model lm_studio/<model-name>
For example, if you’re using Qwen 3 Coder:
aider --model lm_studio/qwen/qwen3-coder-30b
The model name must include the full path as it appears in LMStudio. For programming tasks and code generation, specialized models like Qwen 3 Coder produce better results than general-purpose models. You can verify the exact name by checking the http://localhost:1234/v1/models endpoint we tested earlier, or simply by looking at the model name in the LMStudio interface.
Practical case: Generating a complete landing page from scratch
This is where it all makes sense. We’re going to use aider connected to our local LMStudio to generate a complete modern landing page project from scratch. We don’t need existing code—we’ll simply ask the AI to create the entire project: semantic HTML structure, responsive CSS styles, JavaScript for interactivity, and a professional design ready to use.
This is exactly the scenario where local AI demonstrates its real value. It’s not just about generating code quickly, but about creating a professionally structured project that includes best practices, is responsive, has clean and documented code. All without sending your work to external servers and without usage limits beyond physical ones.
Environment preparation
First make sure LMStudio is running with the API server active and you have Qwen 3 Coder loaded, which is the programming-specialized model we’ll use for this example. Create an empty directory for the new project and navigate to it in your terminal. Verify you have the environment variables configured correctly for aider to use LMStudio.
    mkdir landing-page-demo
    cd landing-page-demo
Project generation
We run aider with a specific and detailed instruction. Since we’re starting from scratch, aider will create all necessary files. We use the --message or -m flag to send the instruction. I usually communicate in English as it’s more efficient, but recent model versions also work very well with other languages like Spanish:
aider --model lm_studio/qwen/qwen3-coder-30b --message "Create a modern and professional landing page for a SaaS software product. Generate exactly 3 files: 1) index.html with semantic HTML5 structure, navigation, hero section with call-to-action, main features section, pricing section with 3 plans, and footer. 2) styles.css with responsive design, professional color palette, clear typography and subtle animations. 3) script.js with smooth scroll, scroll animations and hamburger menu for mobile. Use clean, well-structured code and commented where necessary."
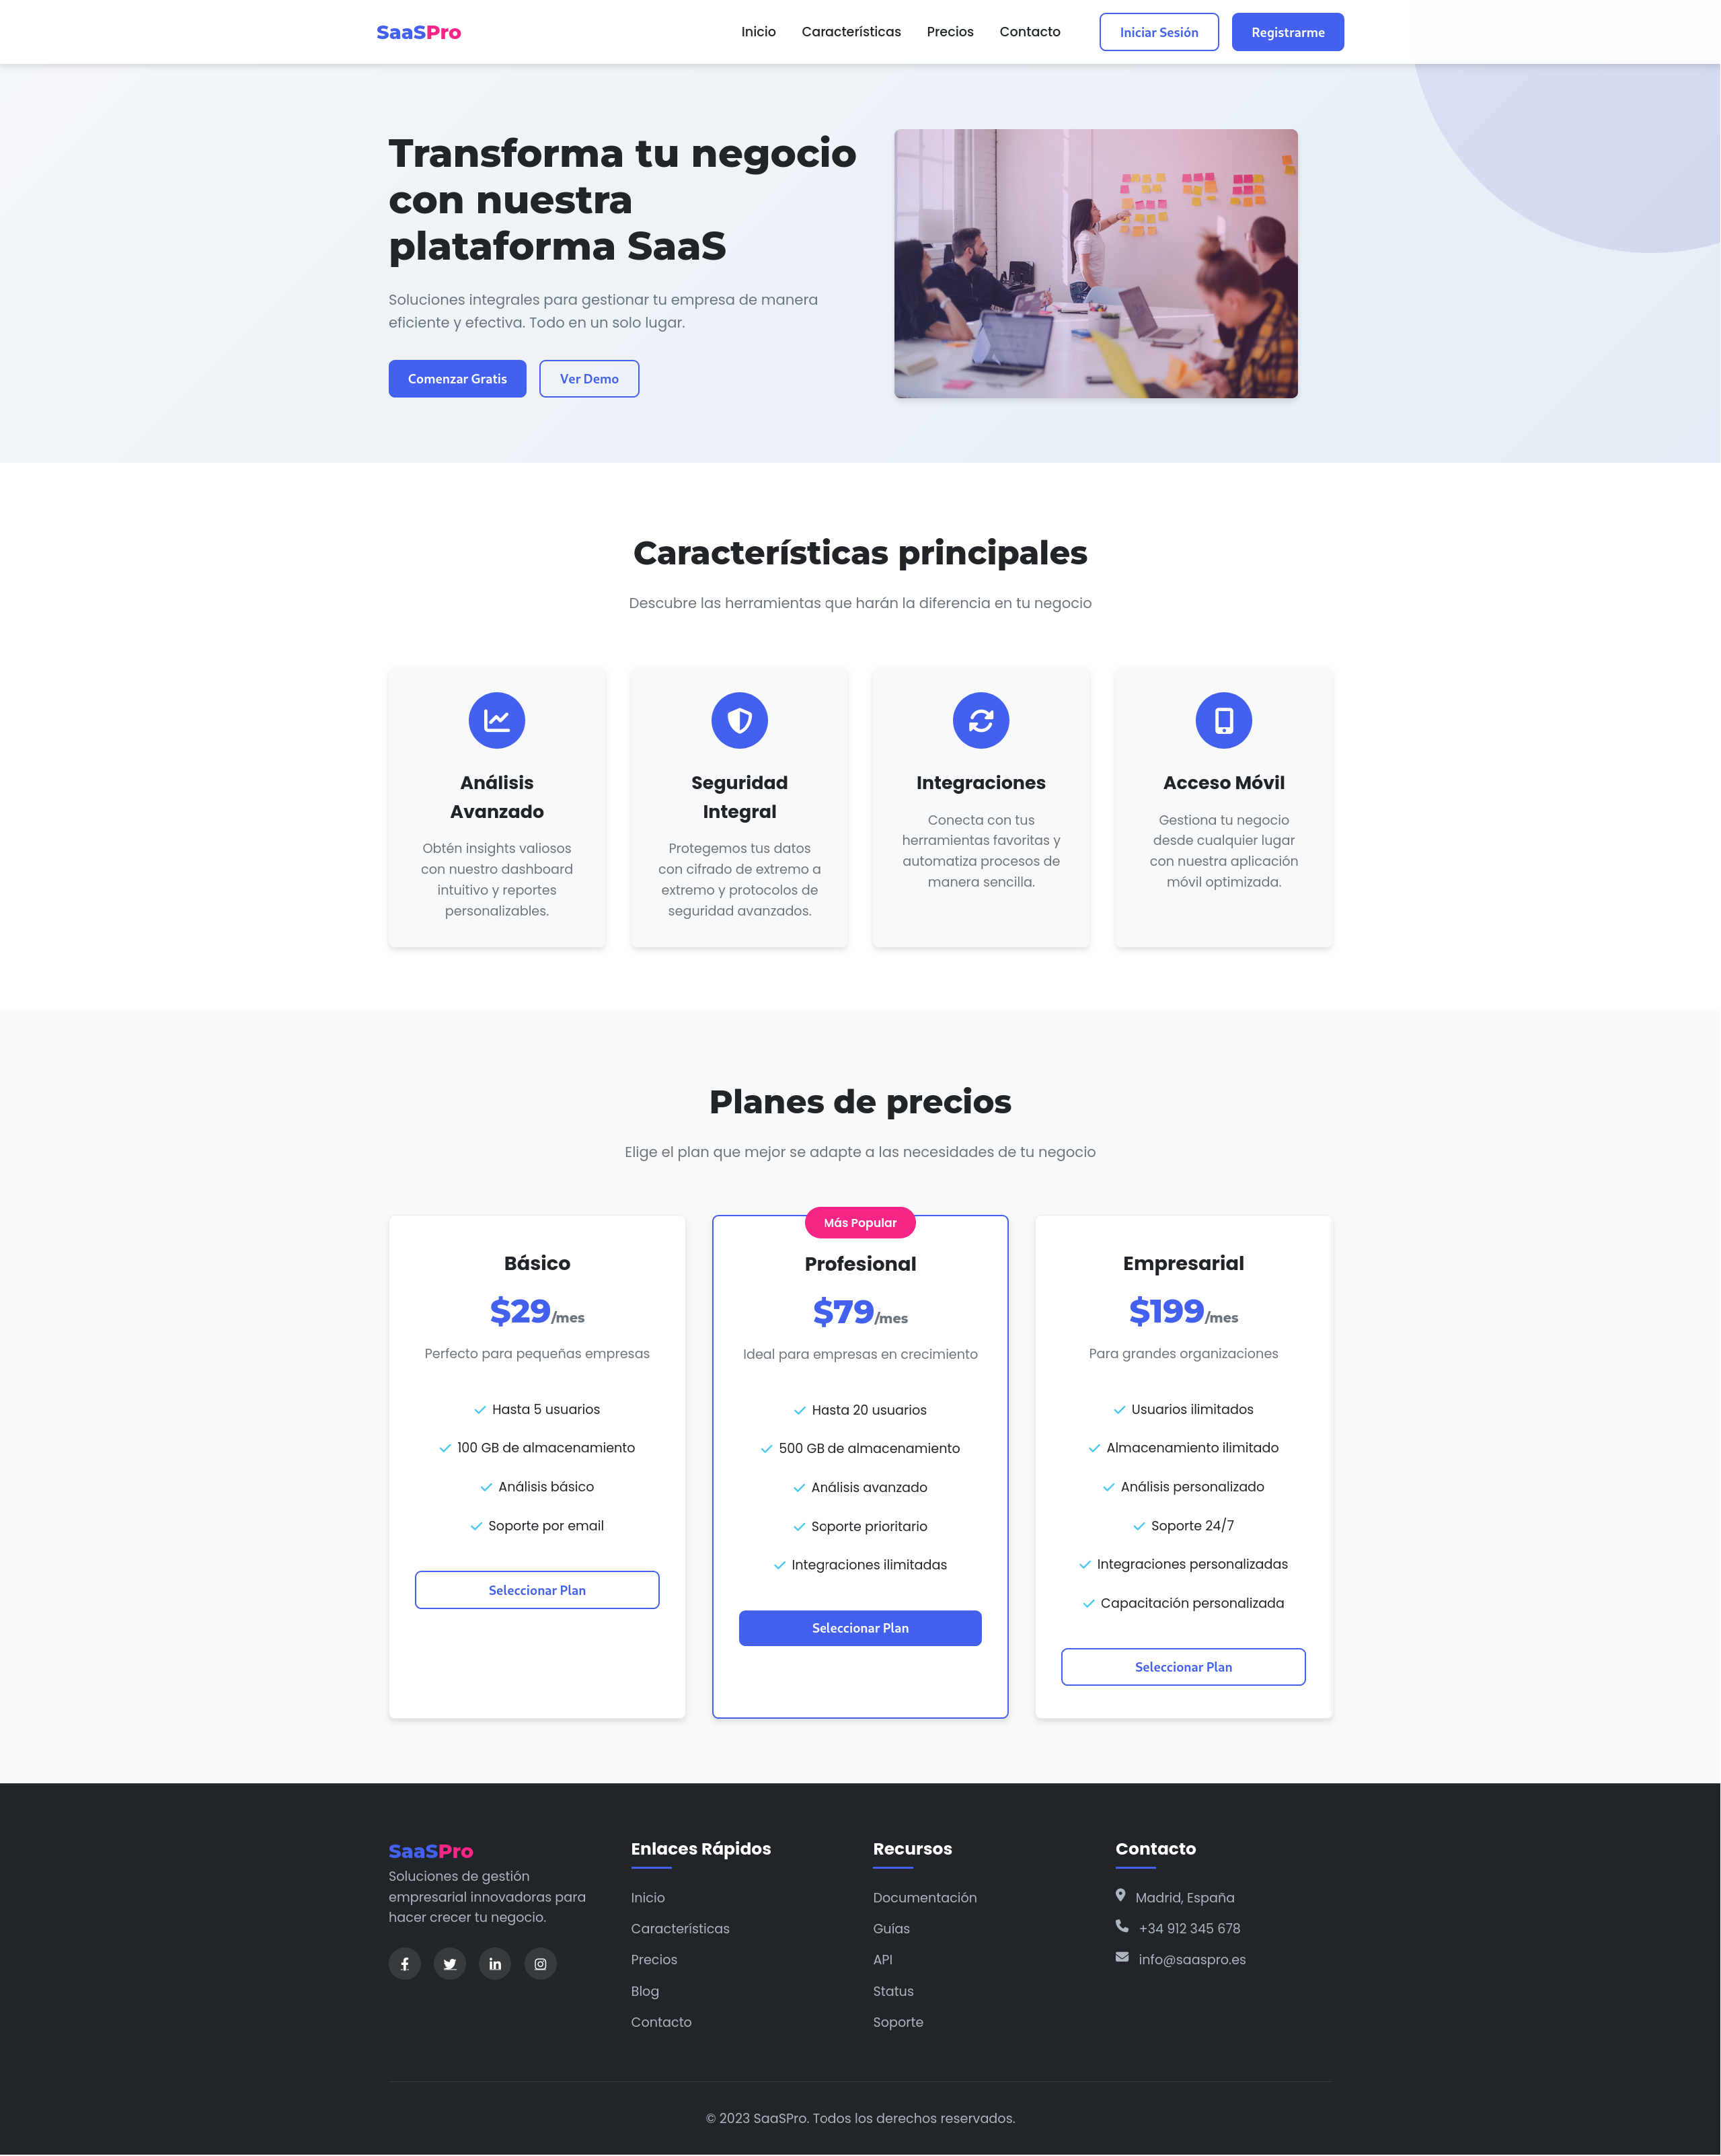
Aider will generate the three files (HTML, CSS, and JS) creating a complete and functional landing page. The process may take a few minutes depending on your hardware.
The generated result
Once the command runs, aider generates the three files in a matter of minutes. Let’s look at key fragments of the generated code in our case:
HTML - Hero section
    <!-- Hero Section -->
    <section class="hero" id="home">
        <div class="container hero-container">
            <div class="hero-content">
                <h1 class="hero-title">Transform your business with our SaaS platform</h1>
                <p class="hero-description">Comprehensive solutions to manage your company efficiently and effectively. Everything in one place.</p>
                <div class="hero-buttons">
                    <button class="btn btn-primary hero-btn" id="cta-button">Start Free</button>
                    <button class="btn btn-outline hero-btn" id="demo-button">View Demo</button>
                </div>
            </div>
            <div class="hero-image">
                <div class="screenshot">
                    <img src="https://images.unsplash.com/photo-1552664730..." alt="Application dashboard">
                </div>
            </div>
        </div>
    </section>
CSS - Variables and hero styles
    :root {
    --primary-color: #4361ee;
    --secondary-color: #3a0ca3;
    --accent-color: #f72585;
    --light-color: #f8f9fa;
    --dark-color: #212529;
    --transition: all 0.3s ease;
    }

    .hero {
    padding: 10rem 0 5rem;
    background: linear-gradient(135deg, #f5f7fa 0%, #e4edf5 100%);
    position: relative;
    overflow: hidden;
    }

    .hero-title {
    font-family: 'Montserrat', sans-serif;
    font-size: 3rem;
    font-weight: 800;
    line-height: 1.2;
    margin-bottom: 1.5rem;
    color: var(--dark-color);
    }
JavaScript - Smooth scroll and animations
    // Smooth scroll function
    function smoothScroll() {
        const links = document.querySelectorAll('a[href^="#"]');

        links.forEach(link => {
            link.addEventListener('click', (e) => {
                e.preventDefault();

                const targetId = link.getAttribute('href');
                const targetElement = document.querySelector(targetId);

                if (targetElement) {
                    window.scrollTo({
                        top: targetElement.offsetTop - 80,
                        behavior: 'smooth'
                    });
                }
            });
        });
    }

    // Scroll animation function
    function animateOnScroll() {
        const elements = document.querySelectorAll('.feature-card, .pricing-card');

        const observer = new IntersectionObserver((entries) => {
            entries.forEach(entry => {
                if (entry.isIntersecting) {
                    entry.target.classList.add('fade-in-up');
                }
            });
        }, { threshold: 0.1 });

        elements.forEach(element => observer.observe(element));
    }
Result analysis
What’s impressive about this approach isn’t just the speed (you generate in minutes what would manually take hours of development), but the quality and completeness of the produced code. Aider has generated:
Semantic and structured HTML: The code uses appropriate tags like <section>, <nav>, <header> and <footer>, includes accessibility attributes, and has a clear structure with functional navigation, hero section with CTAs, features section with 4 features, pricing table with 3 plans (including one highlighted as “most popular”), and complete footer with links and social networks.
Professional and responsive CSS: The code includes CSS variables for coherent color palette, responsive design with media queries for mobile, tablet and desktop, subtle animations and smooth transitions, modern gradients and visual effects, and grid system for adaptive layouts. The chosen color palette (primary blue, secondary purple, accent pink) is modern and professional.
Functional and well-organized JavaScript: Smooth scroll for fluid navigation, fully functional hamburger menu for mobile, scroll animations using Intersection Observer API, header effects when scrolling, and modular code with clearly separated functions. All JavaScript is commented and organized so it’s easy to understand and modify.
The generated landing page is immediately usable: you can open it in the browser and see a professional design working without needing adjustments. More importantly, it’s fully customizable. The code uses CSS variables, reusable classes, and a modular structure that makes it easy to modify colors, texts, images, and functionality according to your specific needs. This saves you the hours of initial setup, basic structure, and design decisions that every project requires.
Iteration and refinement
If the result isn’t exactly what you need, you can iterate quickly. You can run aider again with more specific instructions:
    # Change visual style
    aider --model lm_studio/qwen/qwen3-coder-30b styles.css -m "Change the color palette to dark tones with neon blue accents, modern cyberpunk style"

    # Add functionality
    aider --model lm_studio/qwen/qwen3-coder-30b script.js -m "Add a video modal that opens when clicking a demo button"

    # Improve responsive design
    aider --model lm_studio/qwen/qwen3-coder-30b styles.css -m "Improve responsive design for tablets, adjust breakpoints and optimize layout on medium screens"

    # Add sections
    aider --model lm_studio/qwen/qwen3-coder-30b index.html -m "Add an FAQ section with expandable frequently asked questions"
You can also start an interactive session with aider --model lm_studio/qwen/qwen3-coder-30b without the -m flag to have a more dynamic conversation where you can refine the design in real time, request specific layout adjustments, or add new functionality step by step.
Best practices for consistent results
After using aider with local AI on real projects, certain practices make the difference between mediocre and excellent results. Model selection according to task is fundamental: code-specialized models like Qwen 3 Coder work better for code generation, tests, refactoring, and technical documentation. General-purpose models like GPT OSS are better for user documentation, conceptual explanations, and tasks that require more creativity than technical precision.
When using aider, be specific in your instructions. Instead of “document this,” say “generate a README with these sections: installation, basic usage, API reference, and examples. Use Markdown format with code blocks.” Specificity helps the model generate exactly what you need. If working with large projects, consider adding only relevant files to the context instead of letting aider analyze the entire project. For example, aider src/api/*.js instead of just aider in a project with thousands of files.
Leverage the .aiderignore file system to exclude directories that don’t add value like node_modules, .git, dist, build, etc. This speeds up analysis and reduces noise in the context. You can create an .aiderignore file in your project root with patterns similar to .gitignore.
For projects with sensitive data, always review which files aider is considering before running commands. Although everything is local and private, it’s good practice not to include files like .env, configuration files with credentials, or database dumps with personal information. Use the /ls command within an aider session to see which files it’s considering.
Finally, keep sessions focused. If you’re generating documentation, focus only on that. If you later need to generate tests, start a new aider session. This keeps context clear and prevents the model from getting confused between different tasks. Long sessions with many accumulated changes can degrade response quality.
Local AI vs cloud services
Now that you’ve seen local AI in action integrated into a real workflow, it’s worth considering when to use each option. Initial setup of LMStudio with aider requires some configuration, while tools like GitHub Copilot or Cursor are immediate with a subscription. The per-use cost of LMStudio is zero apart from the electricity your equipment consumes, while cloud solutions have recurring monthly or annual costs.
In privacy, LMStudio offers total control since your code never leaves your machine, while cloud tools necessarily send your code to external servers for processing. This can be a critical issue if you work with proprietary code or sensitive data under strict NDAs. Latency in LMStudio depends on your hardware, typically between 2 and 10 seconds per response, while cloud solutions are generally faster with 1 to 3 second responses thanks to their GPU clusters.
In quality, LMStudio with 30B or more parameter models offers good results, excellent with 70B+ models if your hardware supports it, while flagship cloud models offer consistently excellent quality. LMStudio availability is constant, works even offline, while cloud solutions require stable internet connection.
Usage limits in LMStudio only depend on your hardware and patience, while some cloud tools have limits on number of completions or tokens per month. Scalability is limited by your machine in LMStudio (realistically one project at a time), but is practically unlimited in cloud solutions if you pay more.
Ideal use cases for LMStudio with aider are personal development and learning, projects with strict privacy requirements, prototyping without cost concerns, and offline work without reliable connection. Cloud solutions are better for large teams needing collaboration, projects requiring maximum iteration speed, when working with enormous codebases that exceed your hardware capacity, and when you need the latest state-of-the-art model capabilities.
The optimal hybrid strategy is to use local AI for daily development, experimentation, and sensitive code, and use cloud solutions when you need maximum speed, when working in teams with shared tools, or for critical features where model quality is decisive for the outcome.
Next stops on our local AI journey
You’ve made it this far and now you have LMStudio running as an API server, aider configured and connected to your local AI, understanding of the complete flow from project to generated documentation, and practical experience generating professional documentation for real projects. The next step is to explore aider’s full capabilities beyond documentation.
Experiment with test generation by running aider on existing modules and asking it to generate complete coverage. Try incremental refactoring by taking legacy code and improving it step by step with AI assistance. Use aider for code review by running it on your changes before committing and asking for quality analysis, possible bugs, and performance improvements.
Also explore other specialized models available in LMStudio. Try models specific to different programming languages if you work with multiple stacks. Experiment with smaller models for simple tasks where speed matters more than perfection. Compare results between models to understand which works best for each type of task in your specific workflow.
Consider creating aliases and functions to streamline your daily work. For example, an aidoc function that runs aider with your preferred documentation prompt, or aitest that generates tests with your project’s specific configurations. Integrate aider with git hooks for automatic tasks like generating descriptive commit messages or validating changes before push.
Finally, contribute to the community by sharing your experiences, prompts that work well, and useful configurations. Local AI is a rapidly evolving field and the community benefits enormously from real usage experiences in production projects.
Conclusion
We’ve gone from having a local chat to having a personal AI infrastructure integrated into your daily workflow through professional tools. It’s no longer about opening an application and manually requesting something. Now you can invoke artificial intelligence directly on your code, your entire project, with tools that understand context, maintain coherence across files, and can intelligently modify code.
The practical example shows us this isn’t a toy or an academic experiment: it’s a professional tool that generates production-quality results usable in real projects. And all without sending a single line of code outside your machine, without monthly subscriptions, without artificial usage limits, without concerns about proprietary code privacy or sensitive data.
Local AI has evolved from being a curious experiment for enthusiasts to being a legitimate piece of infrastructure for professional developers. It doesn’t replace cloud services for all use cases, and it would be naive to claim that. But for personal development, rapid prototyping, processing sensitive code, and repetitive tasks where the accumulated cost of subscriptions would be significant, it offers a unique combination of privacy, total control, and zero operational cost.
Tools like aider demonstrate you don’t need to be an expert in scripts or APIs to leverage local AI. The infrastructure exists, it’s mature, and it’s ready to integrate into your daily workflow. You just need to take the step to configure it.
Welcome to the world where AI is part of your development toolkit, not another subscription.
Happy Hacking!