In the last chapter, we covered the basics of Linux, the most commonly used user-friendly distributions, where to get Ubuntu, and how to boot it on our computer to try it out or install it. We also explored the most common desktop environments and some of the essential applications for each of them. We discussed the terminal, how to access it, and some of the fundamental commands to navigate the file system, create and delete directories, and install applications.
In this second part, we will delve deeper into the operating system, understanding its organization, configuration, user management, and other topics that will enhance our understanding of how Linux works. We will begin by exploring user management and then move on to the directory tree and how the file system is hierarchically organized, among other things.
Before delving into our topic, it is crucial to understand an important distinction in the history and philosophy underlying this operating system. You will often hear people refer to it as “Linux,” but in reality, this designation is not entirely accurate. Most of the time, it is more appropriate to call it “GNU/Linux.”
The difference lies in the fact that GNU, which stands for “GNU’s Not Unix,” is a project that began in the 1980s under the leadership of Richard Stallman and the Free Software Foundation (FSF). Its goal was to create a complete, open-source, and Unix-compatible free operating system. Over the years, GNU developed numerous tools and essential utilities for an operating system, such as the GCC (GNU Compiler Collection) compiler, the Bash shell, and many more. However, a key component was missing: the core of the system.
This is where Linux, developed by Linus Torvalds in 1991, came into play. It was precisely the missing kernel to complete the GNU operating system. When the Linux kernel was combined with the GNU tools and utilities, a full operating system was created, which is what most people refer to as “Linux.” Nevertheless, to acknowledge GNU’s significant contribution to the system, many voices in the free software community advocate calling it “GNU/Linux.”
This distinction may seem trivial, but for those who value the philosophy of free software and community collaboration, it is important to recognize the work of both projects. So, going forward, when you hear or read about this operating system, keep in mind that the nomenclature “GNU/Linux” more accurately reflects the reality of its origin and development.
For this guide, we will mainly use the command line since it is generally the common link between distributions and desktop environments. We will mention tools with a graphical interface that can perform the same tasks.
If you want to try the commands that will be executed from now on without affecting your system, you can virtualize Debian with Docker using a simple command:
docker run -it debian /bin/sh
This will launch a command console that allows us to simulate a freshly installed real environment with which we can perform our tests. If you don’t have Docker installed, you can find the necessary documentation on their website.
User management
In this type of environment, there is generally a root user, often called root, who serves as the system administrator, a superuser. This user has total privileges and absolute control over the operating system, making it the most powerful and dangerous account in the system. Therefore, extreme caution must be exercised when performing operations with it since errors resulting from misuse are not uncommon among beginners or those who started using it.
This user can perform critical tasks such as installing and uninstalling software, configuring the system, accessing all files and directories, modifying permissions, and making fundamental changes to the system configuration. However, with great power comes great responsibility, and using the root account recklessly can have serious consequences.
There are many internet memes about copying and pasting commands obtained online that result in a corrupted or deleted system. If you don’t know what a command does, don’t execute it, especially as the root user.
It is not recommended to use the root account regularly for everyday tasks, which is why the system itself encourages
you to create a standard user during the installation process. Instead, it promotes the use of regular user accounts
with limited privileges for most activities. When it is necessary to perform tasks that require elevated permissions,
you can use the sudo (superuser do) command to temporarily grant these privileges. You can also work as root using
the su (switch user) command followed by your password.
User management is an essential part of Linux system administration. It allows you to control who has access to the system, what privileges they have, and how the system behaves for each user.
To create a user in Linux, use the useradd command. For example, to create a user named “new_user,” you would run the
following command as root:
useradd -m new_user
To be able to use the sudo command, you need to add your user to the sudoers file located in etc or use
the usermod command to add them to the sudo group. You would need to execute this command as root as well:
usermod -aG sudo new_user
From now on, you can elevate privileges on demand with sudo when commands require it, provided that you are performing
system administration tasks.
To be able to log in to the system and perform specific administrative tasks with our “new_user,” you need to assign a password that will be requested later with the following command:
passwd new_user
If you switch to the user with su new_user, the first character of the terminal line will change from “$” (dollar),
indicating restricted mode, to “#” (hash), indicating administrator mode.
Users can be grouped into groups, which makes permission and access management easier. You can create groups using
the groupadd command and add users to an existing group using the usermod command.
sudo groupadd new_group sudo usermod -aG new_group new_user
You can verify that both the user and the group have been created and related by creating a group that, for now, only
contains our “new_user” using the getent tool:
getent passwd getent group
We will notice that our user also has their own group, as the system itself creates and adds it to simplify permission and access management, streamline collaboration in work environments or projects, expedite the management of shared resources by allowing permission assignment based on secondary groups, and at the same time, provide a degree of privacy and isolation by allowing the configuration of specific permissions, among other things. This results in efficient administration and greater flexibility in file and resource management. In future posts, we will explore permission management for both users and groups, folders, and files.
During its installation, the system creates a series of users that allow the system to execute specific processes. When
displayed with getent, we can observe several well-differentiated parts in each of the entries: the username, what
used to be the password hash, a unique user identifier, another for the primary group, a field for additional user
information, the home directory, and the shell used:
new_user : x : 1000 : 1000 : : /home/new_user : /bin/sh
These are the most important ones:
- root: The root user (UID 0) is the system superuser with full control over all operations. It has unrestricted access to all files and directories and is used for critical administrative tasks in the system.
- daemon: The daemon user (UID 1) is used to run system services in the background. Although it has limited system access, it is generally not used for interactive sessions and focuses on running essential services.
- bin: The bin user (UID 2) is responsible for executing essential system binaries. Its main function is to run basic commands required during system startup and recovery.
- sys: The sys user (UID 3) is intended to run processes related to the system and the kernel. It has no interactive access and is used for critical system operations and diagnostics.
- sync: The sync user (UID 4) is used to synchronize the file system, ensuring that data is written to the disk safely. This user plays a significant role in data integrity.
The same applies to the various default groups that are created to manage different parts of the system and determine what each of the added processes and users is allowed to do. The most important ones are:
- sudo: The “sudo” group is used to allow users to run commands with superuser privileges using the “sudo” command. Users belonging to this group can perform administrative tasks when needed.
- audio: This group is used to provide access to audio devices.
- disk: Users belonging to this group can access disk devices, such as USB drives and hard disks.
- cdrom: This group provides access to CD/DVD drives and allows users to mount and access optical discs.
- video: The “video” group is used to provide access to video devices, such as graphics cards.
- staff: In some distributions, the “staff” group is used to allow users to perform certain administrative tasks.
- users: This group is created by default and generally includes all users not belonging to other specific groups.
- nogroup: This group is used for files or resources to which no specific group is assigned.
When you view them with getent, you’ll notice a similar pattern to the user entries. It shows information about the
groups, such as their name, an “x” in place of what used to be password representations, a group identifier, and the
list of members who belong to the group:
sudo : x : 27 : nuevo_usuario,otro_usuario
Unless you’re configuring a system for a super-specific and controlled environment, you won’t need to manually assign yourself to groups or modify the ones that come with the system, as it’s designed to work with a more or less standard configuration.
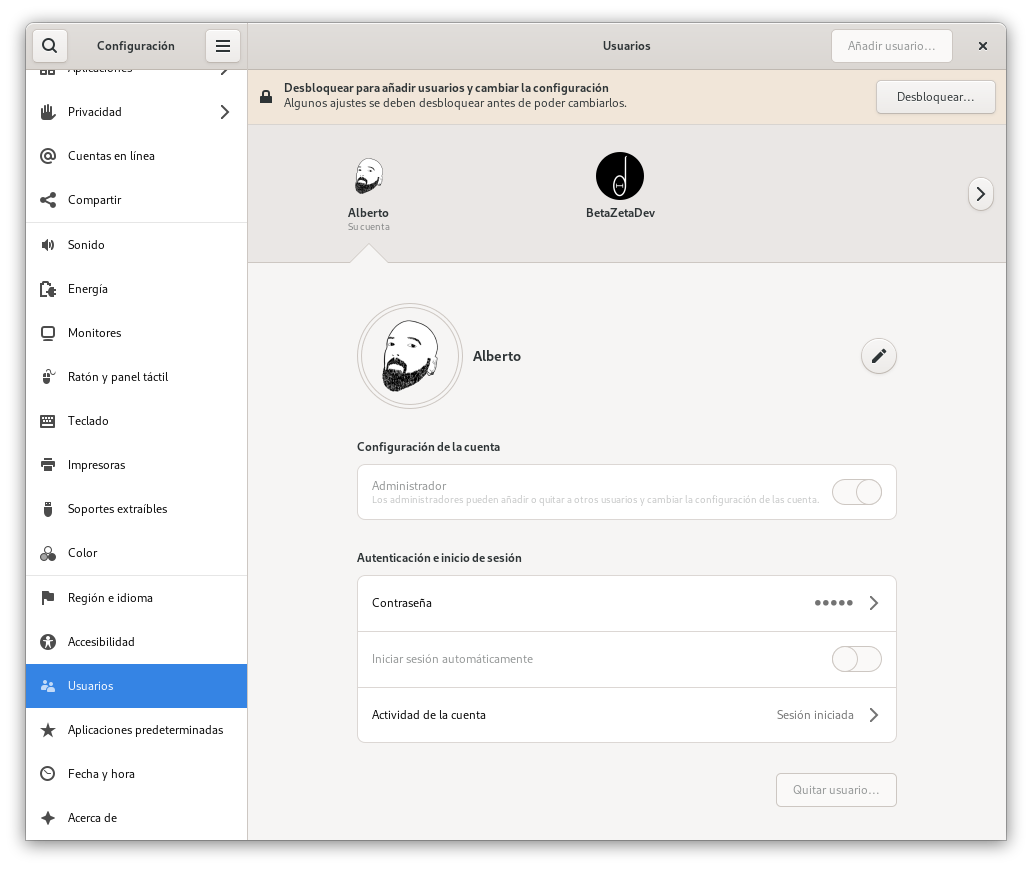
You can perform all of these tasks from a desktop environment like Gnome or KDE, using your mouse as if you were working with any other consumer operating system. In Gnome, you can access the system administration panel and open the “Users” option:
Directory tree and file organization
Understanding the structure of the file system and how files and directories are distributed is essential for effective Linux system administration. Linux is an operating system where directory organization is critical. Each folder has a name and a purpose. Unlike other operating systems where the roles of each part may feel more arbitrary, in Linux, everything is intelligently divided and organized.
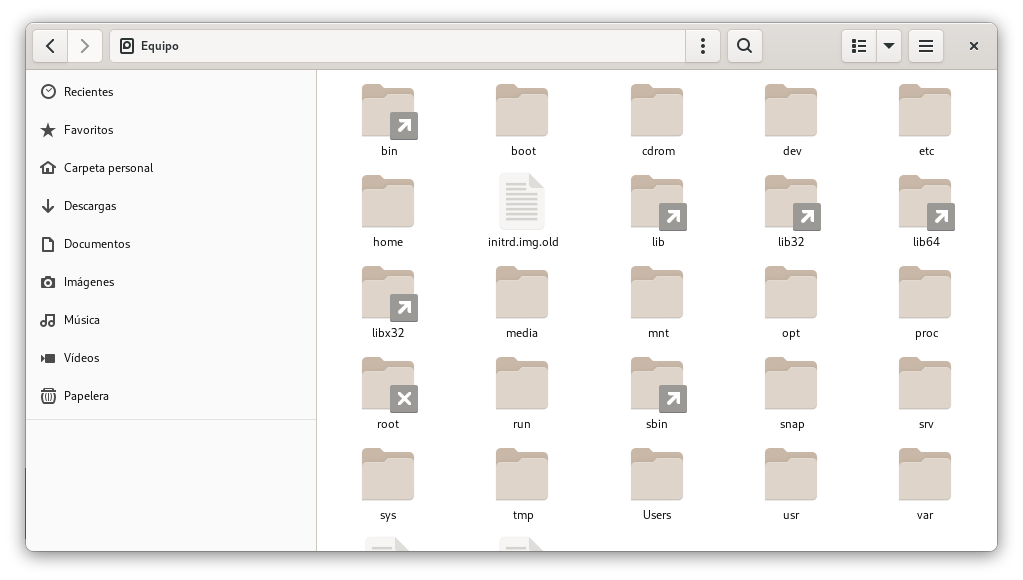
The “/” (root) directory is the primary location, the parent directory of every folder that makes up a GNU/Linux system. Every other folder descends from it, and it’s as critical as the ones we’ll explore below for the proper functioning of the system. The default directory tree in almost all Linux distributions looks like this, although there might be minor differences in less common distributions:

You can infer the function of each directory from its name, but here’s a breakdown:
- /bin: Contains essential system binaries, including basic commands used during system boot and recovery.
- /etc: Stores system and application configuration files. Here, you’ll find network configuration files, user settings, services, and more.
- /home: The users’ personal directory. Each user has their own subdirectory within /home to store personal files and configurations.
- /var: Holds variable files such as system logs, temporary files, and data that changes over time.
- /usr: Stores non-essential system files and programs, including installed applications, libraries, and documentation.
- /root: The personal directory of the root user, the superuser with complete control over the system mentioned earlier.
- /opt: Used to install additional applications not provided by the base system.
- /srv: Stores data used by system services, such as websites or data repositories.
- /mnt and /media: Directories for mounting devices and removable media, such as external hard drives or USB drives.
- /dev: Contains device files that represent hardware in the system, such as hard drives, printers, and network devices.
- /proc and /sys: Virtual file systems used to interact with the kernel and configure hardware.
- /tmp: A space for storing temporary files used by running applications and processes. These are ephemeral data and aren’t designed for long-term storage. They are typically cleared with each reboot.
In Linux system administration, you generally only need to be familiar with a subset of the directories mentioned above to perform most everyday tasks. However, knowing the existence and function of all these directories is valuable because it provides better control and understanding of the system, essential for maintaining your systems.
Let’s consider the bin directory; it stores essential programs that run in the command line. Every time you use
commands like ls to list files in the current directory or cd to change to a different directory, you’re actually
executing executable files located in “/bin.” The name comes from “binary” because the files here are binary and
executable.
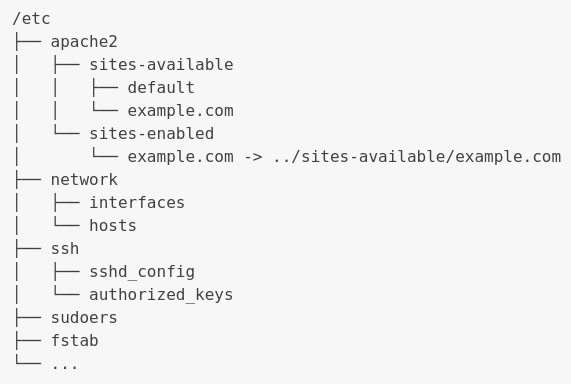
In the etc directory, you’ll find system configurations, especially boot tools, services, and administration. It’s one of the most common places to check if a part of the system or an application is not working as expected. Its subdirectories will be named after the corresponding component, and inside, you’ll find text files or scripts in various formats that describe configurations.
The following could be an actual example of a server offering web
and SSH (Secure Shell) connections, along with other system files
like fstab, which defines disk partitions and how they are mounted under specific conditions. It also shows
the network folder containing network configuration files and the sudoers file, indicating which users have
permission to temporarily escalate privileges using the sudo command:
Many of the graphical applications we use in any of the desktop environments make changes to these files every time we modify the configuration of their respective components. Often, in addition to making changes to the files, these applications are programmed to perform other tasks such as restarting the corresponding service to apply the changes. This facilitates management and automates what we would have to do through the command line by combining multiple commands.
Within home, each user has their own directory with their username as the folder name. These personal directories store user-specific files and configurations, ensuring privacy and data separation between different system users. For example, if you have users named “user1” and “user2,” you will find their personal directories at “/home/user1” and " /home/user2," respectively.
Each user’s personal directory in home can contain various elements such as documents, images, desktop settings, music files, and more. Additionally, important configuration files, like .bashrc that controls command line configuration for that specific user, are stored in the personal directory. This separation of personal directories simplifies the management of individual data and configurations on multi-user systems.
The “.” (dot) in front of the file name indicates to the system that it’s a hidden file and, therefore, should not be
displayed unless the user requests it. This can be used for both files and directories and prevents them from appearing
in regular file listings. To view them with the ls command, you need to specify it with:
ls -a
The “-a” (letter “a”) option is used to display all files, including hidden ones. Without this parameter, hidden files wouldn’t appear in a standard file listing.
In addition to user files and personal directories, user-specific configuration files are also stored. These files are essential for customizing the user experience on Linux.
Configuration files in the user’s personal directory take precedence over system configuration files in etc. For example, if a user has a customized .bashrc file in their “/home/user” directory, that file will take precedence over the global .bashrc file in “/etc”. This allows users to customize their environment individually without affecting the system-wide configuration.
The var directory (short for “variable”) is designed to store data that can change or evolve during system operation. Here, system logs, such as event log files or error logs, provide essential information for system monitoring and diagnosis. In addition to logs, var also stores temporary files used by applications to hold temporary data that doesn’t require long-term preservation, but they are not as ephemeral as those stored in tmp. This flexibility in data management in var allows Linux to maintain a detailed record of events and temporary resources without filling other directories with ephemeral data.
On the other hand, the “/srv” directory (from the English “service”) is used to host specific data for services or applications on the system. Unlike “/var,” which focuses on data that dynamically changes during system operation, " /srv" stores data required for the functionality of specific services. For example, if you run a web server on your system, your website’s files are likely to be stored in “/srv/www”. This approach provides an organized and logical location to access data required by services and applications, facilitating the management and access to specific application resources.
Of course, you can also access and manage these directories from your graphical interface using any of the available desktop environments. In this case, we see the file explorer integrated into Gnome: