Express.js is a minimalist, flexible framework that provides a robust set of features for web applications. With Express, you can build efficient backend solutions that manage server logic, routes, interactions with databases, and much more, all under an architecture that’s easy to understand and utilize.
It is widely used in web development due to its speed, flexibility, and ease of use. Being a minimalist framework, it allows developers to quickly and efficiently create backend applications. One of the distinctive features of Express.js is its straightforward and effective routing system, which allows defining routes and handling HTTP requests in a clear and concise manner.
It also offers a wide range of middlewares, which are functions executed during the lifecycle of an HTTP request. These can be used for tasks like authentication, data compression, request logging, among others. Express.js’s flexibility to integrate third-party middlewares makes it easy to implement additional functionalities in an application without having to do complex programming from scratch. In this case, we use a Middleware that will allow us to interpret the body of HTTP requests containing data in JSON format.
The HTTP protocol, defined in RFC 2616, specifies a series of methods used to perform operations on a web server. The most common methods are GET, POST, PUT, DELETE, and OPTIONS, among others. Express.js provides methods to handle each of these types of HTTP requests, allowing developers to create highly functional and efficient web applications. Each of these methods is used to perform a specific operation on a resource on the web server.
- GET: Used to retrieve data from a resource on the web server. For example, when accessing a web page in a browser, a GET request is made to retrieve the content of the page.
- POST: Used to send data to the web server for processing. For example, when submitting a form on a web page, a POST request is made to send the form data to the server.
- PUT: Used to update a resource on the web server. For example, when editing an entry in a database, a PUT request is made to update the data of the entry.
- DELETE: Used to delete a resource on the web server. For example, when deleting an entry in a database, a DELETE request is made to remove the data of the entry.
- OPTIONS: Used to retrieve the allowed methods on a resource on the web server. For example, when making an OPTIONS request to a web page, the allowed methods on the page are retrieved.
It’s a standard that is quite old and has been updated over time, and although it has changed since then, in essence, it remains the same. HTTP request methods are fundamental to the development of web and mobile applications, as they allow developers to perform operations on a web server efficiently and securely.
Creating a REST API with Express is surprisingly simple, allowing us to focus on the specific logic of your application rather than the low-level details of HTTP request handling. We will proceed with a practical example of how to deploy a REST API with Node.js and Express using Docker. This example will provide readers with a step-by-step guide to configure, develop, and deploy our own API.
Make sure you have Docker installed on your system. Follow the installation instructions from
our introduction article if you haven’t done so already. To start, create a new src
folder for your project and navigate into it, then create an app.js file and initialize the project using npm.
npm init -y
Next, install the express package using npm:
npm install express
Within the project folder, we’ve created the app.js file with the source code for our API. Open it with your preferred
text editor or IDE and add the following code to create a basic REST API with a simple endpoint at the root path to
start:
    const express = require('express');
    const app = express();
    const PORT = 3000;

    app.use(express.json());

    app.get('/', (req, res) => {
        res.send('¡Hola Mundo con Express y Docker!');
    });

    app.listen(PORT, () => {
        console.log(`Servidor corriendo en http://localhost:${PORT}`);
    });
The code above creates an Express server that listens on port 3000 and responds with the message “Hello World with
Express and Docker!” when the root path is accessed using the HTTP protocol’s GET method. The line app.use( express.json()) is middleware necessary for Express to interpret the body of HTTP requests containing data in JSON
format. Now that we have created our API, let’s create a Dockerfile to define how our Docker image will be built. Inside
the project folder, create a file called Dockerfile and add the following content:
    FROM node:14-alpine
    WORKDIR /app
    COPY package*.json ./
    RUN npm install
    COPY . .
    EXPOSE 3000
    CMD ["node", "app.js"]
This file instructs Docker on how to build our application’s image. In this case, we are using the official Node.js
image, version 14, based on Alpine Linux. This Docker setup involves creating a working
directory named /app where it will install our application’s dependencies using npm install with the package.json
file copied from our working folder. Then, it will copy the rest of the application files into the work directory and
expose port 3000 to make it accessible from the host. Finally, it will run the command node app.js to start the
Express server.
With this, we are ready to dockerize our application and deploy it, locally in this case, though only a few adjustments would be needed for production deployment. To build the Docker image, execute the following command in the terminal:
docker build -t library-api .
This will create a Docker image named library-api based on the Dockerfile we have created. Once the image has been
built, we can run a Docker container based on it with the following command:
docker run -p 3000:3000 library-api
In this way, we will launch a Docker container that listens on port 3000 and redirects requests to our application, handling the received HTTP request based on what the source code determines, in this case, returning the message “Hello World with Express and Docker!”. If everything has gone well, immediately after launching the Docker container, we should see the message “Server running at http://localhost:3000” in the terminal. We can test this by accessing the indicated URL from our preferred browser, and we should see the welcome message.
Now we are going to create more complex endpoints for our API, for example, we will manage the fictitious catalog of a
library of books. For this, we create a variable to store the list of books with their id, title, author, *
year*, and availability. Initially, this list will be stored in the server’s memory, in this case, our Docker
container, so they will only be available while the container is running. Add the following code to the app.js file:
    let books = [
        {id: 1, title: "El Quijote", author: "Miguel de Cervantes", year: 1605, available: true},
        {id: 2, title: "Cien años de soledad", author: "Gabriel García Márquez", year: 1967, available: true}
    ];
With this initial data, we are going to modify the app.js file to add the endpoint that allows us to access the list
of books:
    app.get('/books', (req, res) => {
        res.status(200).json(books);
    });
To apply the changes and make use of our new endpoint, we will need to stop the Docker container that is running and rebuild the image and launch it again. For this, we execute the following commands separately in the terminal:
    docker stop $(docker ps -a | grep "library-api" | awk '{print $1}')
    docker build -t library-api .
    docker run -p 3000:3000 library-api
These commands are responsible for stopping the container that is currently running by its name, thanks to the
combination with grep and awk, rebuilding our Docker image, and launching it again. Now, after accessing the
URL http://localhost:3000/books, we should see the list of books in JSON format:
    [
      {
        "id": 1,
        "title": "El Quijote",
        "author": "Miguel de Cervantes",
        "year": 1605,
        "available": true
      },
      {
        "id": 2,
        "title": "Cien años de soledad",
        "author": "Gabriel García Márquez",
        "year": 1967,
        "available": true
      }
    ]
To avoid having to stop and relaunch the container every time we make a change in the source code, we will add all the endpoints we need and then restart it:
    // New book
    app.post('/book', (req, res) => {
        const {title, author, year, available} = req.body;
        const newBook = {id: books.length + 1, title, author, year, available};
        books.push(newBook);
        res.status(201).send(newBook);
    });

    // Add books in bulk
    app.post('/books', (req, res) => {
        const newBooks = req.body.books;
        newBooks.forEach(book => {
            const newBook = {
                id: books.length + 1,
                title: book.title,
                author: book.author,
                year: book.year,
                available: book.available
            };
            books.push(newBook);
        });
        res.status(201).json(newBooks);
    });

    // Update a book
    app.put('/books/:id', (req, res) => {
        const {id} = req.params;
        const {title, author, year, available} = req.body;
        const book = books.find(book => book.id === parseInt(id));
        if (book) {
            book.title = title;
            book.author = author;
            book.year = year;
            book.available = available;
            res.status(200).json(book);
        } else {
            res.status(404).send('Libro no encontrado');
        }
    });

    // Delete a book
    app.delete('/books/:id', (req, res) => {
        const {id} = req.params;
        const book = books.find(book => book.id === parseInt(id));
        if (book) {
            books = books.filter(book => book.id !== parseInt(id));
            res.status(200).send('Libro eliminado');
        } else {
            res.status(404).send('Libro no encontrado');
        }
    });
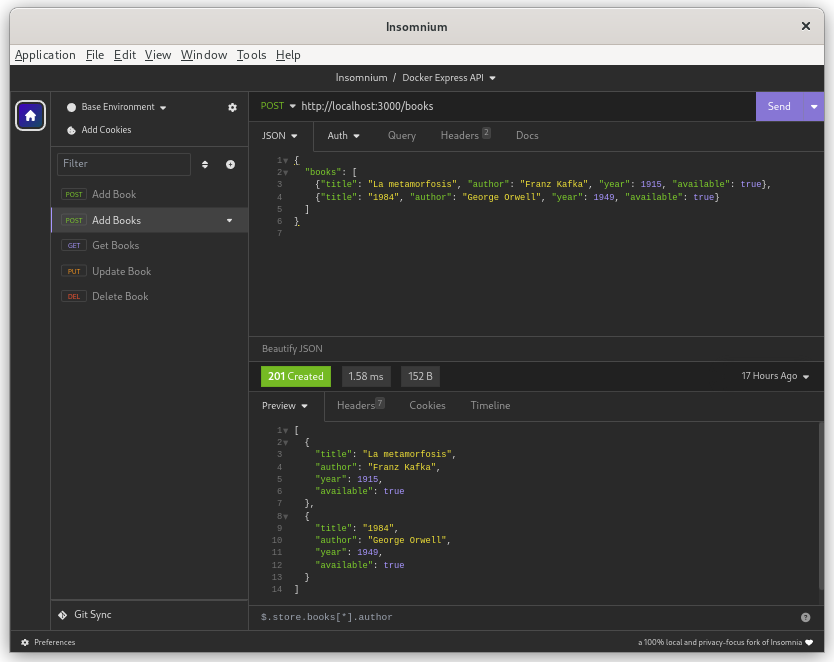
After restarting the Docker container, we can test the new endpoints with an HTTP client such as Insomnium, Postman, or any other. We can create, update, and delete books from our fictional library. In our case, we choose Insomnium, an open-source, cross-platform HTTP client that allows us to make HTTP requests to our API and see the responses from our local machine without the need for cloud accounts or external servers as intermediaries.
We can make a POST request to the URL http://localhost:3000/book with the following body to add a new book to our
library:
    {
      "id": 3,
      "title": "1984",
      "author": "George Orwell",
      "year": 1949,
      "available": false
    }
If everything has gone well, we should receive a response with the new book added, similar to the request body. In the screenshot below, we can see how we have added two new books to our fictional library using Insomnium:
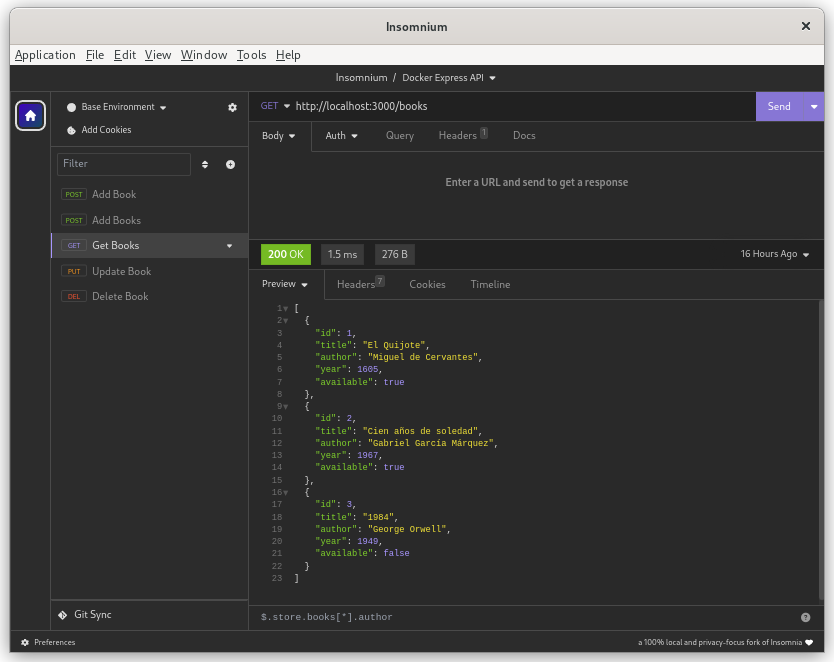
We can also make a GET request to retrieve the list of books updated:
From here on, we can make use of the other CRUD operations (Create, Read, Update, Delete) to manage
our book list. With this, we have created a REST API with Node.js and Express and deployed it in a Docker container.
We’ve created endpoints to access the book list, add new books, update existing books, and delete books. We used
Insomnium to test our API and saw how we can perform CRUD operations on our API using an HTTP client. This is a simple
example of how we can create a REST API with Node.js and Express and deploy it in a Docker container. I hope this
article has been useful and provided you with a step-by-step guide to creating your own REST API
with Node.js and Express.
In the next chapter, we will see how to deploy the same API but with data persistence using a database virtualized with
Docker and using docker-compose instead of Docker directly, which will allow us to have a more complex and realistic
architecture even combining different services in the same container for a more efficient management of our data and
projects.
If you have any questions or comments, please feel free to leave them in the comments section below. Happy Coding!