Automation and advanced logic in your database …
In the previous chapters of this series, we’ve explored everything from foundational concepts of …
read moreIn a world where efficiency and scalability are key factors for any development team or tech company, process automation has become an essential tool. Automating repetitive tasks, manual workflows, or integrations between services not only saves time and resources but also minimizes errors and allows teams to focus on what truly matters: innovating.
Automation isn’t a new concept, yet it has evolved rapidly thanks to the rise of low-code and no-code tools, along with open-source platforms that offer a high degree of customization. Today, you can connect APIs, run custom scripts, move data between systems, and respond to events in real time without building solutions from scratch.
From simple tasks like sending an email when a form is submitted to more complex flows involving validations, conditional decisions, and data synchronization across multiple systems, automation is present in almost every area of modern development—and it has never been more accessible than it is today.
In this article we’ll explore the most popular tools in today’s ecosystem and focus especially on n8n, a powerful and flexible open-source solution for designing and executing automated workflows. We’ll cover its main features, use cases, and how to get started with it in a Docker-based virtualized environment.
The ecosystem of automation tools has grown exponentially in recent years. There are now solutions for every level of experience, from fully visual platforms aimed at non-technical users to frameworks designed for developers who need complete control over their workflow logic.
Below you’ll find a summary of the most widely used tools in 2025, together with their main features and focus:
One of the pioneering platforms in the no-code space. Zapier lets you connect thousands of SaaS applications through “Zaps,” which are simple workflows based on events (triggers) and actions. It’s ideal for low-level automations such as sending notifications, copying data between spreadsheets, or posting to social media.
Make offers a more technical and detailed interface than Zapier, enabling you to build more complex flows. Its scenarios can include conditional logic, loops, and more advanced data transformation.
n8n (pronounced n-eight-n) stands out as an open-source alternative aimed at developers and teams who prefer to control their own infrastructure. It supports both visual flows and extensibility through JavaScript code and custom command execution.
Developed at Airbnb and now part of the Apache Foundation, Airflow is a tool geared toward complex data flows. Written in Python, it is used mainly in data engineering environments to manage ETL pipelines.
Each of these tools has its place depending on the project type, the team’s technical level, and customization or privacy requirements. In the next section we’ll focus on n8n, analyzing why it has become a favorite option for developers who seek flexibility without losing ease of use.
n8n—short for “nodemation”—is a workflow-automation platform that has gained great popularity in recent years, especially among developers and technical teams looking for a more flexible and controllable solution than traditional platforms like Zapier or Make.
Its proposition is clear: provide an open-source, self-hostable, and highly extensible alternative without limiting the number of executions or integrations. This makes it an ideal choice for projects that require both visual automation and full backend control.
Open source and self-hostable
You can deploy n8n on your own server, container, or cloud infrastructure, giving you full control over data, security, and scaling. Its Fair-Code license also allows commercial use with certain restrictions if the service is redistributed.
Low-code visual interface
Its visual editor lets you drag and drop nodes to build flows intuitively without losing power. Each node represents an action such as an HTTP request, a database query, or sending an email.
Integration with 350+ services and APIs
It includes preconfigured nodes for popular services like GitHub, Slack, Google Sheets, PostgreSQL, Notion, and more. You can also extend it by creating custom nodes in JavaScript or TypeScript.
Support for conditional logic and dynamic execution
Flows can include conditions, loops, waits, expressions, and custom scripts using JavaScript, enabling you to build truly complex automations.
Advanced webhooks and triggers
n8n can act as a receiver for external events via webhooks, or run flows based on cron jobs, timers, or changes in external services.
Scalable and extensible
You can run it in a Docker container, connect it to external databases (such as PostgreSQL), run multiple instances, and hook it up to job queues for distributed processing.
n8n is aimed at developers, sysadmins, and technical teams who need to:
Unlike purely no-code tools, n8n offers a friendly entry point without sacrificing the power of programming when needed.
Later on, we’ll see how you can start working with n8n easily by virtualizing it with Docker and creating your first test workflow.
To help you better understand n8n’s position within the automation ecosystem, below is a comparison table against two of the most popular platforms: Zapier and Make (formerly Integromat).
| Feature | n8n | Zapier | Make (Integromat) |
|---|---|---|---|
| License | Open Source (Fair-Code) | Proprietary | Proprietary |
| Self-hosting | ✅ Yes | ❌ No | ❌ No |
| Number of executions | ✅ Unlimited | 🔒 Plan-limited | 🔒 Plan-limited |
| Conditional logic | ✅ Advanced (via code) | ⚠️ Basic | ✅ Moderate |
| Visual interface | ✅ Yes (low-code) | ✅ Yes (very simple) | ✅ Yes (detailed) |
| Code-level customization | ✅ JavaScript & Python (beta), custom nodes | ❌ No | ⚠️ Built-in functions |
| Technical orientation | 👨💻 High | 👤 Low | 👥 Medium |
| Node extension | ✅ Fully extensible | ❌ No | ⚠️ Limited |
| Triggers & Webhooks | ✅ Webhooks, cron, events | ✅ SaaS triggers | ✅ Webhooks & scheduled |
| Community | 📈 Active & technical | 📣 Broad, business-oriented | 🤝 Technical & creative |
As you can see, n8n excels in projects that require full control, self-hosting capabilities, customization, and execution of complex logic. Conversely, if you need speed and ease without writing code, tools like Zapier or Make may be more suitable for less technical environments.
In the next section, we’ll look at how to quickly spin up a working n8n environment using Docker, and we’ll test a basic automation workflow.
One of n8n’s greatest advantages is how easy it is to get started—especially if you’re already familiar with Docker. In this section, we’ll deploy n8n on your local machine using docker-compose and create a simple workflow from its visual interface.
docker-compose.yml fileIn an empty directory, create a file named docker-compose.yml with the following content:
  version: "3"

  services:
    n8n:
      image: n8nio/n8n
      ports:
        - "5678:5678"
      environment:
        - N8N_BASIC_AUTH_ACTIVE=true
        - N8N_BASIC_AUTH_USER=admin
        - N8N_BASIC_AUTH_PASSWORD=adminpassword
        - N8N_HOST=n8n.local
        - N8N_PORT=5678
      volumes:
        - n8n_data:/home/node/.n8n

  volumes:
    n8n_data:
Once you’ve created your docker-compose.yml file, it’s time to launch the n8n environment and verify everything is running correctly.
From your terminal, in the same directory as the docker-compose.yml file, run:
docker-compose up -d
This command will download the official n8n image (if you don’t already have it) and start the service in detached mode.
You can check that the container is running with:
docker ps
You should see a line similar to this:
  CONTAINER ID   IMAGE         COMMAND                  PORTS                    NAMES
  a1b2c3d4e5f6   n8nio/n8n     "tini -- /docker-ent…"   0.0.0.0:5678->5678/tcp   n8n-service-name
Open your browser and go to http://localhost:5678. You’ll see a login screen because we enabled basic authentication in the docker-compose.yml environment variables.
Enter the credentials you configured in your docker-compose.yml (if you changed them, use your own values):
adminadminpasswordOnce logged in, you’ll have full access to n8n’s visual workflow editor.
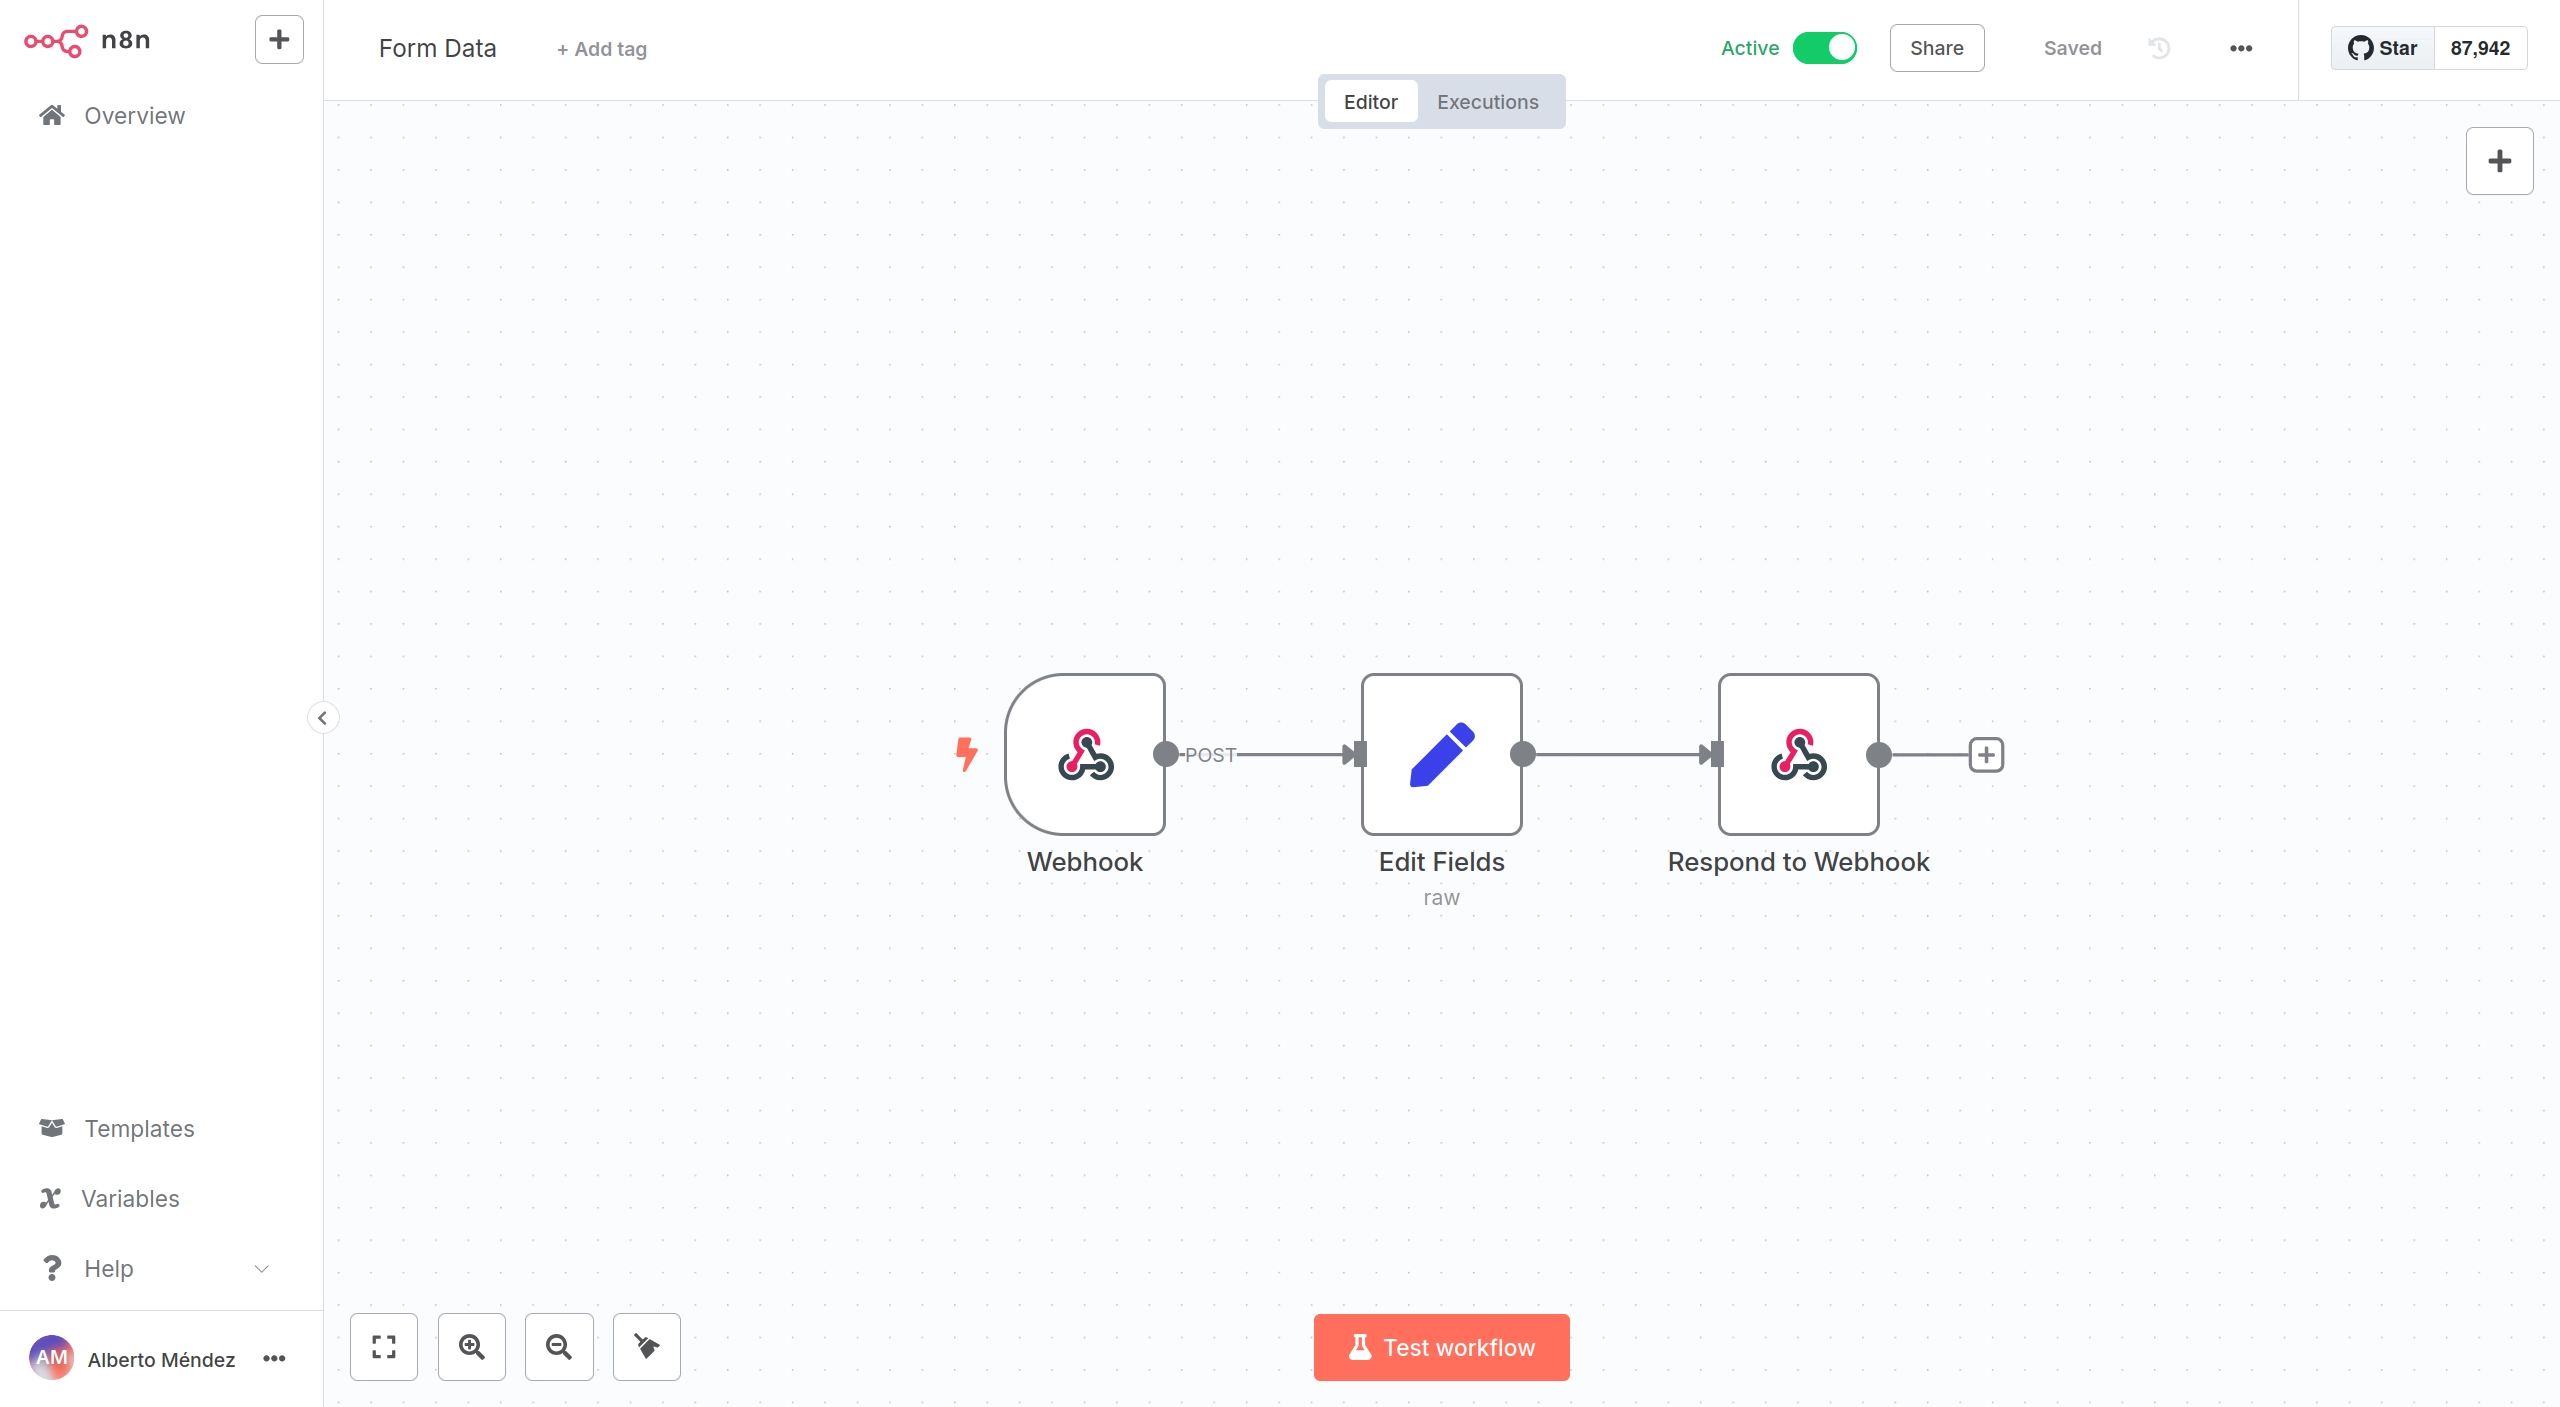
In this n8n workflow we’ll create just three nodes: a Webhook node to receive the request, a Set node to structure the response data, and a Respond to Webhook node to send the response back in the same request.
The configuration for each node in the workflow is as follows:
Webhook:
POST/webhook/contactRespond to Webhook nodeSet:
JSONExpression mode enabled):
{ "response": "Thank you {{ $json.body.name }}. We received your message: '{{ $json.body.message }}'." }
First Incoming ItemAccess-Control-Allow-Origin*Access-Control-Allow-HeadersContent-TypeTo test it, we’ll create a simple HTML form that asks the user for a name and a message, and then returns that information to the Webhook to display and confirm successful execution. Make sure to activate the workflow using the Test workflow button. Once activated, load the form in your browser.
Save this file as form.html on your local machine:
  <!DOCTYPE html>
    <html>
      <head>
        <meta charset="UTF-8" />
        <title>Contact Form</title>
        <style>
          body {
            margin: 0;
            padding: 0;
            font-family: 'Segoe UI', sans-serif;
            background-color: #f4f6f8;
            display: flex;
            align-items: center;
            justify-content: center;
            height: 100vh;
          }

          form {
            background-color: #fff;
            padding: 30px;
            border-radius: 8px;
            box-shadow: 0 0 15px rgba(0, 0, 0, 0.1);
            width: 100%;
            max-width: 400px;
          }

          h2 {
            text-align: center;
            margin-bottom: 20px;
            color: #333;
          }

          label {
            font-weight: bold;
            color: #555;
            margin-top: 10px;
            display: block;
          }

          input, textarea {
            width: 100%;
            padding: 10px;
            margin-top: 5px;
            margin-bottom: 15px;
            border: 1px solid #ccc;
            border-radius: 4px;
            font-size: 14px;
            box-sizing: border-box;
          }

          textarea {
            resize: vertical;
          }

          button {
            width: 100%;
            padding: 12px;
            background-color: #007acc;
            color: white;
            border: none;
            border-radius: 4px;
            font-size: 16px;
            cursor: pointer;
            transition: background-color 0.3s ease;
          }

          button:hover {
            background-color: #005fa3;
          }

          #response {
            margin-top: 20px;
            text-align: center;
            font-weight: bold;
            color: #006400;
          }
        </style>
      </head>
      <body>
        <form id="contactForm">
          <h2>Contact form</h2>
          <label for="name">Name:</label>
          <input type="text" name="name" id="name" required>

          <label for="message">Message:</label>
          <textarea name="message" id="message" required></textarea>

          <button type="submit">Submit</button>
          <div id="response"></div>
        </form>

        <script>
          document.getElementById('contactForm').addEventListener('submit', async (e) => {
            e.preventDefault();

            const form = e.target;
            const formData = new FormData(form);

            try {
              const response = await fetch('http://localhost:5678/webhook-test/webhook/contact', {
                method: 'POST',
                body: formData
              });

              const result = await response.json();
              document.getElementById('response').innerText = result.response;
            } catch (error) {
              console.error('Error:', error);
              document.getElementById('response').innerText = 'Error sending form.';
            }
          });
        </script>
      </body>
    </html>
After running the HTML in your local browser with the n8n workflow listening, you can test it by entering the required information in the form. The HTML itself will display the response once all requirements are met.
This example is basic—enough to illustrate n8n’s functionality—but it can be extended to many other use cases, such as sending the received form data via email, storing it in a file on Google Docs or Nextcloud, or even saving it to a database. It all depends on your project’s requirements.
Process automation is no longer an option but a necessity for modern development teams. In this article, we’ve explored today’s automation landscape—from no-code solutions like Zapier to powerful open-source frameworks like n8n.
n8n stands out for its balance of accessibility and power, enabling you to create complex visual workflows with custom logic, connect multiple services and APIs, and maintain full control over your infrastructure.
With just a few lines of configuration and the power of Docker, you can have a working environment up and running in minutes. As we’ve seen with the HTML form example, it’s easy to integrate n8n with any frontend or system that requires event-driven automation.
This is only the beginning. From here you can start to:
Whether you’re on a technical team, in an educational environment, or simply looking to automate personal tasks, n8n is a tool worth mastering. In upcoming chapters we’ll explore more advanced features and use cases to take your business or project workflows to the next level.
Happy Coding!
That may interest you
In the previous chapters of this series, we’ve explored everything from foundational concepts of …
read moreAs databases grow larger and more complex, managing and accessing data efficiently becomes …
read moreIn this series, we’ve explored various database engines, such as SQLite, and the fundamental …
read more