Github Copilot as a development buddy
In today’s article, we will discuss Github Copilot, an AI-driven programming assistant …
read moreFor the creation of Futureland, an imaginary electronic music festival, we used almost exclusively Artificial Intelligence tools. With Midjourney, RunwayML and AudioCraft in a Google Colab, we generated images and audio, later merging it using a video editing program to add small transition effects and text.
We’ve discussed Midjourney on other occasions. On my blog, you can find a comprehensive article on how to create images from descriptive text. For this project, we’ll create a video from scratch, so if you already have Discord installed and Midjourney set up, I recommend opening it.
If you don’t have it installed, simply download it from their website and join the official channel. Keep in mind that anything generated using the public channel will be visible to others. Start a conversation with the bot if you want your creations to remain private.
The requirements and prices are as follows:
The Futureland video was created mimicking the promotional videos of a renowned music festival called Tomorrowland. The current outcome is somewhat lackluster due to the limited capacities of the current algorithms to convert images to video, but it gives us an idea of the potential of these tools and what digital content creation might look like in the future.
In the not-so-distant future, anyone from their home, without the need for actors, cameras, etc., will be able to create a movie based on a script and a series of images and audios generated by Artificial Intelligence according to our requirements. It’s important to note that the tools used here are in the very early stages of development, and from now on, they will only improve in quality and usability options.
We will look at the process of creating a similar video using the same tools but with a different approach: a slightly spooky video, as if it were scenes from a horror movie trailer.
I’m going to assume that we already have Midjourney installed and set up. It’s used through Discord, and to generate images, we use the imagine command. The ideal language for communicating with tools like Midjourney is English, so the prompts will be in this language. Here are the descriptions used and selected images. It’s worth mentioning that the process mostly involves trial and error; not always do we get the desired results the first time, and iterations are often necessary.
Close shot of a dilapidated mansion, silhouetted against the pale glow of the moon, with twisted trees leaning inwards. Windows shattered, ivy consuming walls, and ominous shadows dancing. Deep, dark night.
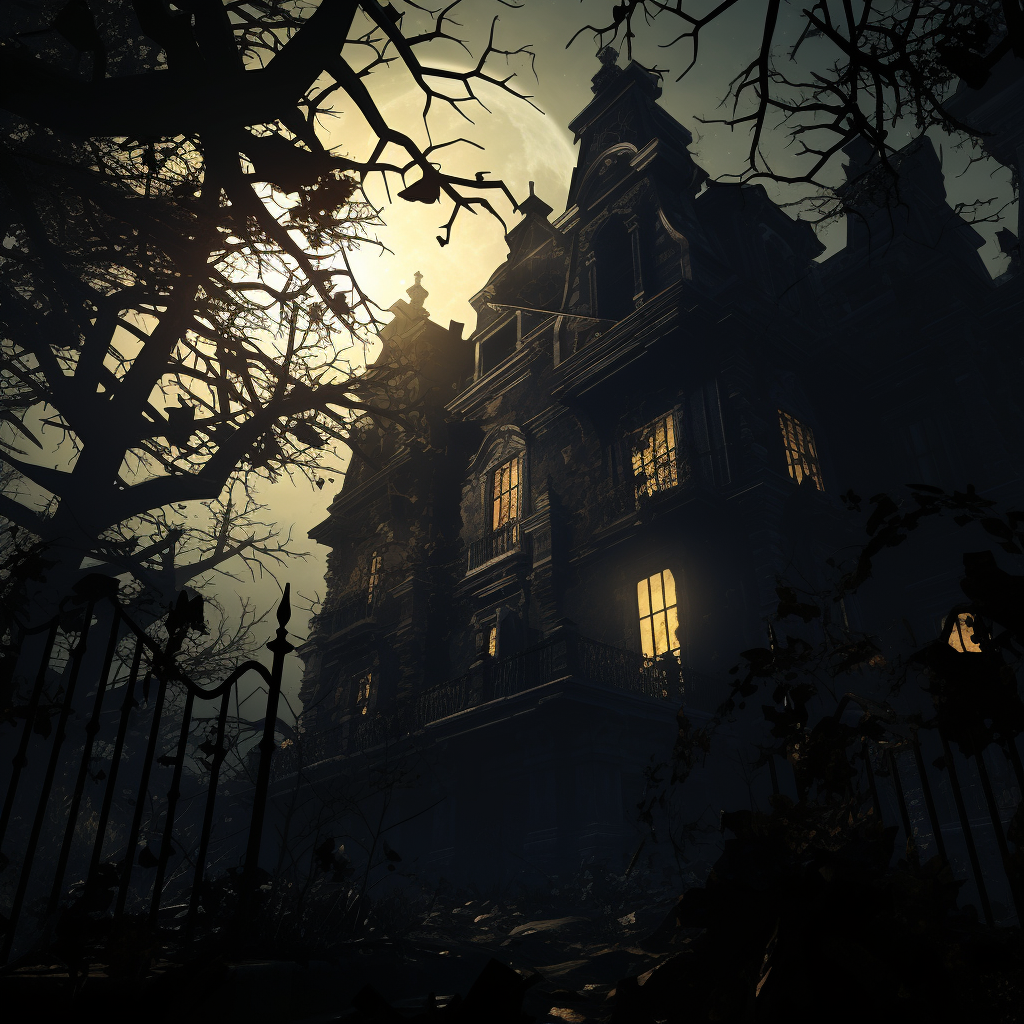
This first capture of the exterior image of our haunted house will lead to the first scene of the video. The idea is to approach the house and then enter it, revealing part of the mystery it holds. So, the next prompt should describe the entrance image of the house. To maintain the style of the previous one, we’ll use its link:
https://s.mj.run/FjZotcaya10 A close-up image of the entrance to the haunted house.

In this way, we can ensure the house’s style and surroundings are maintained. It’s not perfect, and sometimes you might need to repeat the process to get a result that fits the context of our “story”. The selection of the most relevant images depends on our needs and the story we want to tell. Now we’re going to generate one of the main door of the mansion, preserving the style using the link to the previously generated image:
https://s.mj.run/FjZotcaya10 The front door ajar, inviting you to enter.

We’re now assembling the elements for our video. We’ve covered the exterior of our haunted house, so now is the perfect time to venture inside and discover the mysteries it hides. We’ll generate an image of one of the entrance rooms to our house, a hall, and a mysterious mirror. We’ll use the main door’s image again and the following prompt:
https://s.mj.run/FjZotcaya10 The hall of the abandoned haunted mansion, with old, decrepit furniture. A mysterious mirror hangs on the wall.

To finish, we’ll add a creepy element to the scene, for example, an image of a strange figure peering out of the mirror:
https://s.mj.run/zo1bI5ZB3vs A monster from the underworld looming out of the mirror

Now we have the necessary images to create our video, let’s move on to the next tool, RunwayML. With the images downloaded, one by one, we run them through the tool Gen-2 (image to video) to add “movement” to each of them. We’ll do this without entering anything in the prompt, letting the algorithm handle animating our scene. If we add text to the prompt, the algorithm will ignore our image and create something unrelated to our intent, so it’s crucial not to input anything.
After generating and downloading our animated images, we move to the AudioCraft tool to generate the sounds for our video. The process is similar to the steps taken so far, where we have to describe the instruments and sounds present in the scenes.
We’ll use a Google Colab to utilize the sound generation algorithm, where we only need to run each cell using the play button until we reach the last one. Here, we’ll enter the prompts describing the sound we want to generate. After hitting the play button, audio files will appear for us to listen and download using the context menu.
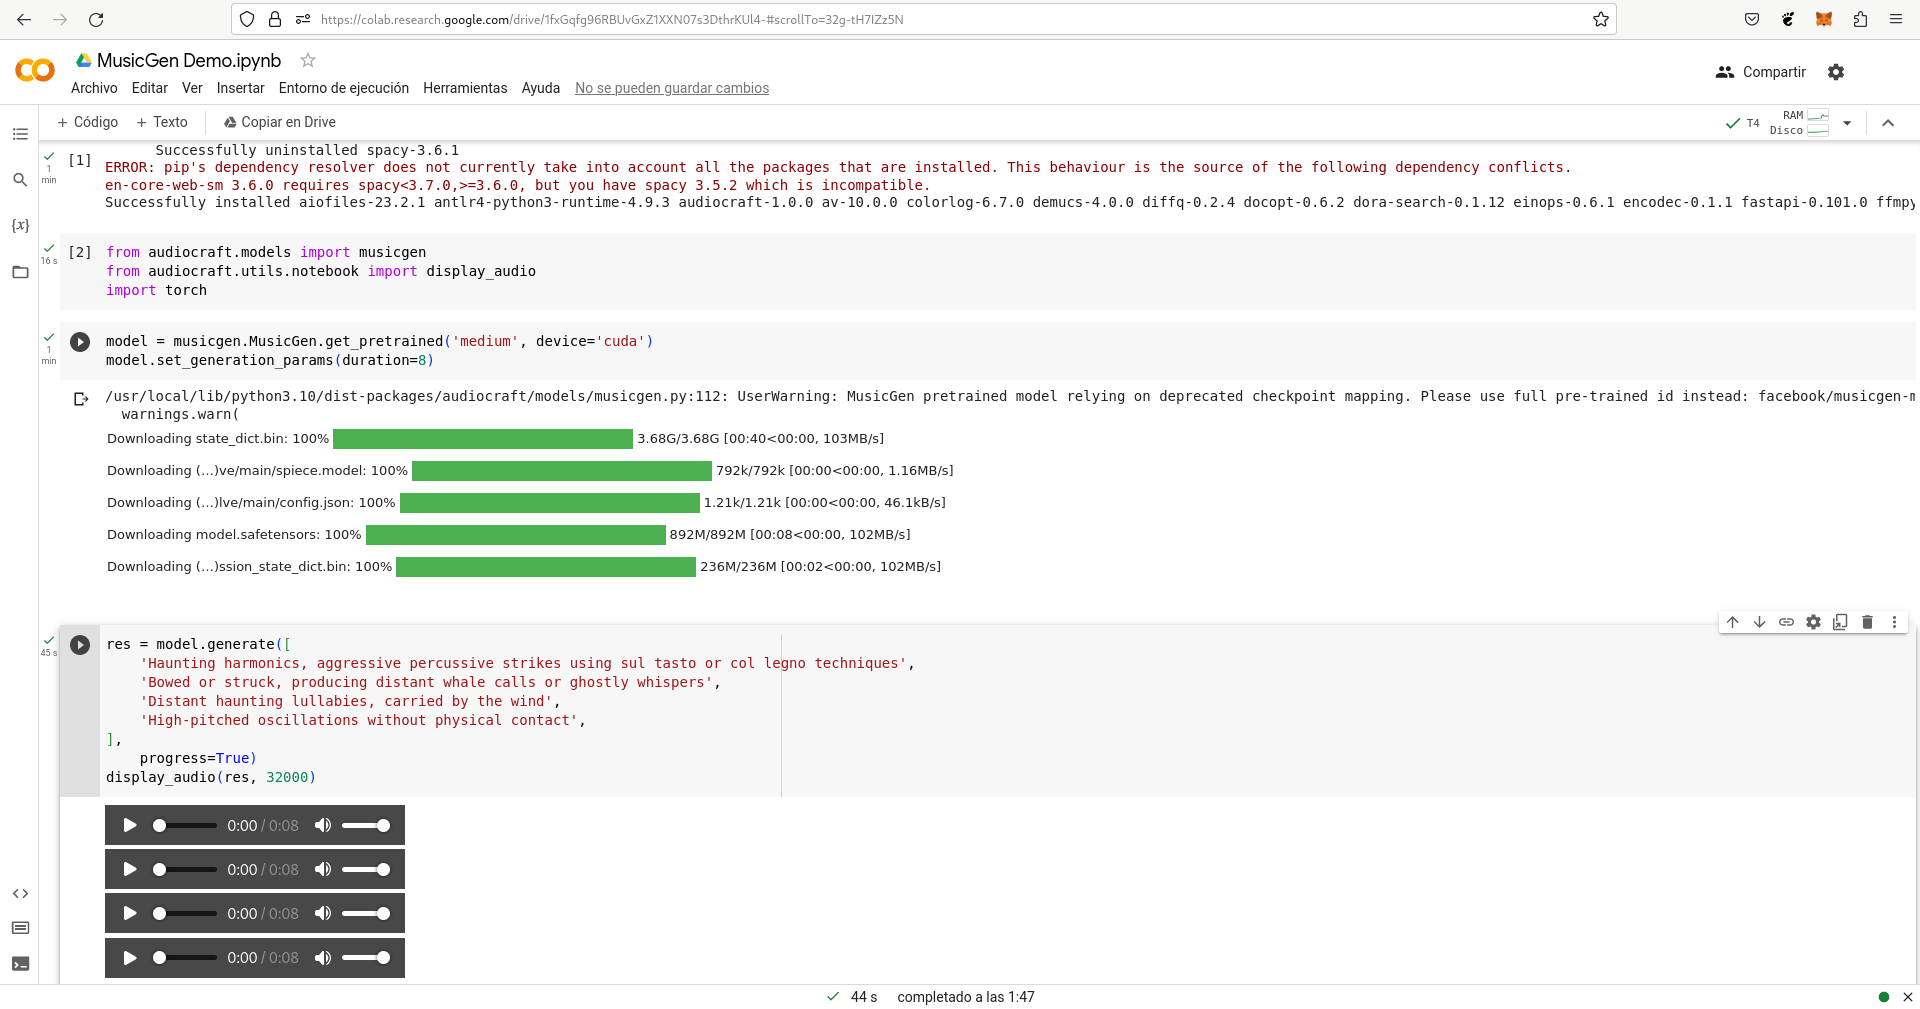
Below are the prompts I used to create the sounds for our sample video:
Haunting harmonics, aggressive percussive strikes using sul tasto or col legno techniques
Bowed or struck, producing distant whale calls or ghostly whispers
Distant haunting lullabies, carried by the wind
High-pitched oscillations without physical contact
Now that we have everything needed to build our video, all that’s left is to put it together using any video editing tool. I used Shotcut, a free and open-source tool. To give it a unique touch, I mixed the end of the images with the beginning, so the video plays in a loop, and the transition cuts aren’t noticeable.
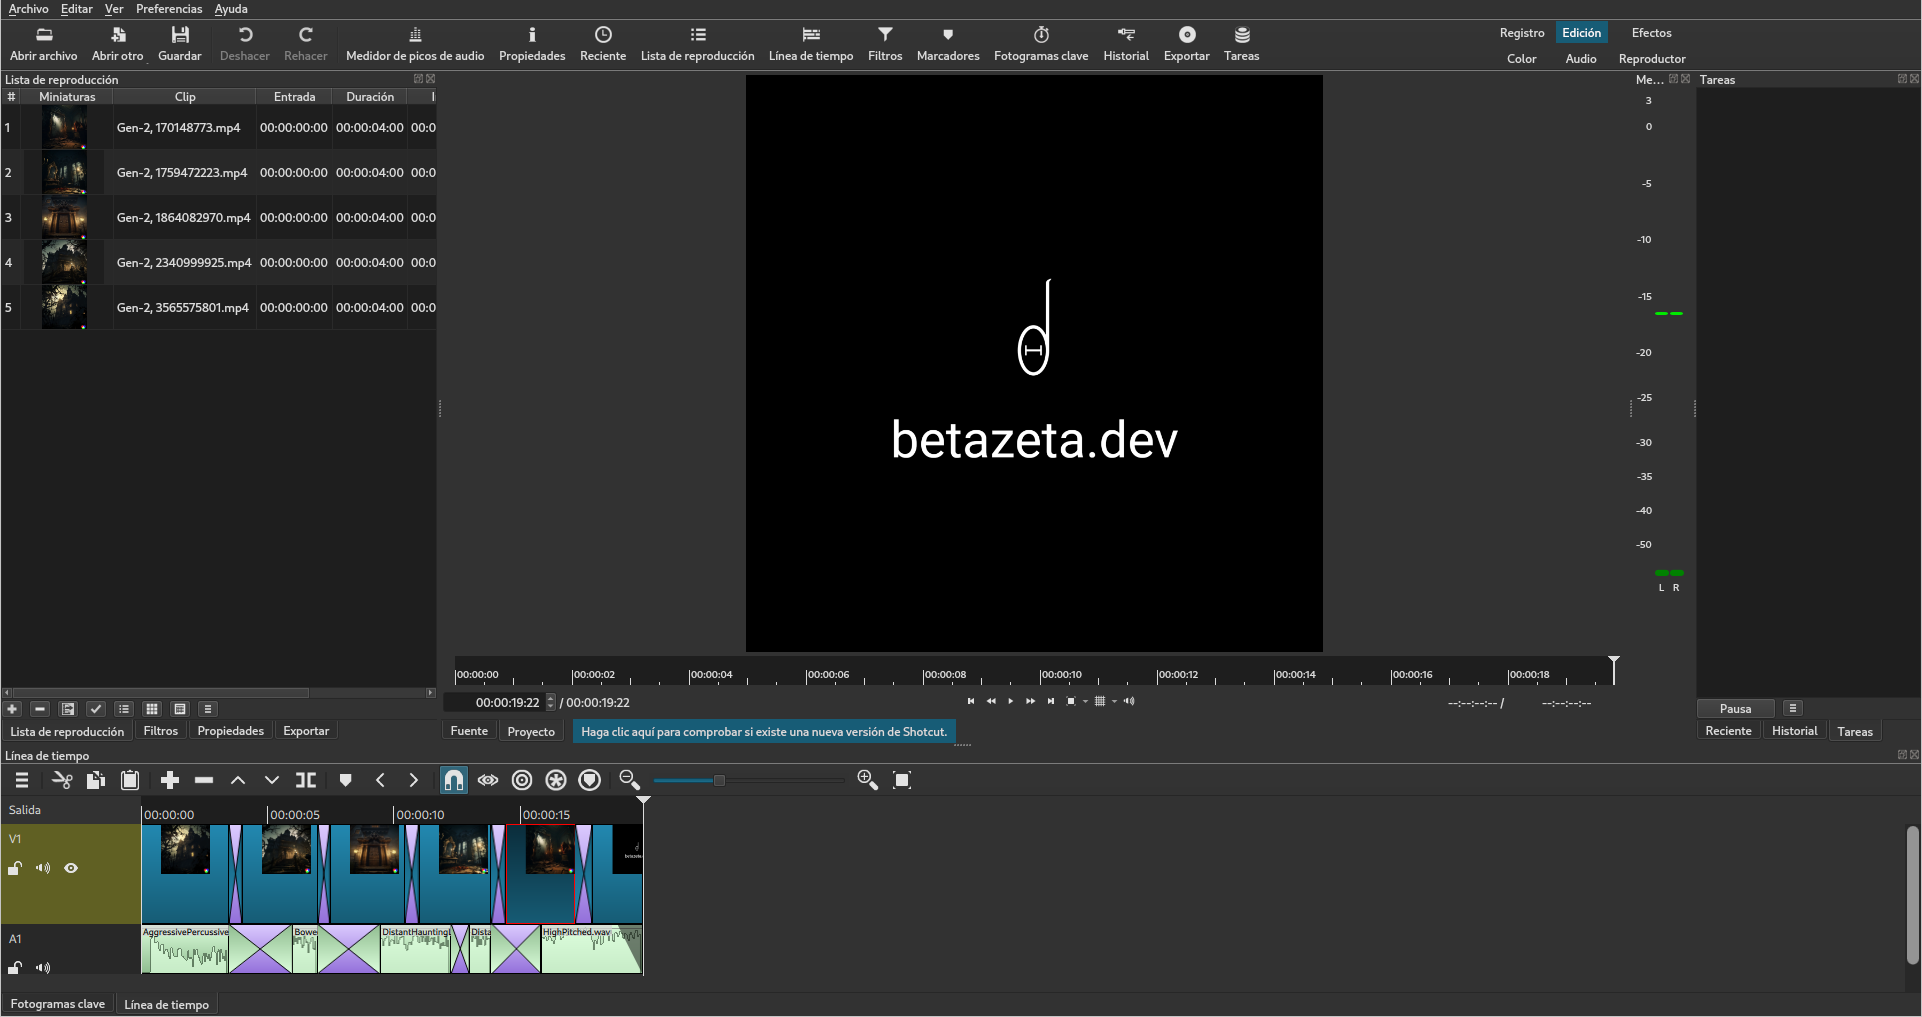
The same goes for the audio; I repeated one part to prevent the audio from abruptly cutting off. This part depends on individual skill and the video’s objective. Here’s the final result:
For now, video creation with AI is in its infancy, and the results are merely intriguing. However, it foretells what we’ll be able to do in the not-so-distant future with such tools. We can anticipate how digital content, movies, video games, or music will be created. Soon, we’ll be able to produce content automatically without the need for technical knowledge, actors, or instruments; all we’ll need is our imagination and a little AI assistance.
That may interest you
In today’s article, we will discuss Github Copilot, an AI-driven programming assistant …
read moreWe have seen the basic functionalities to manage our data that GraphQL offers us. Operations like …
read moreIn this case, we will see how we can take advantage of the auto fill feature of Google Admob to …
read moreConcept to value